In this article, I will introduce tips for photogrammetry to advance your skills.
Introduction
My name is noria901. Hi everyone, Have you ever tried photogrammetry?
There are many articles about photogrammetry in STYLY Magazine. If you want to learn how to use photogrammetry, please check out these introduction articles Introduction to photogrammetry – taking photo & generating 3D model, How to take photos for successful Photogrammetry, and Photogrammetry information – Summary. Additionally, the 銭洗弁天VR article [Photogrammetry] Architectural digital archive has more advanced tips, and is perfect for mid-level learners.
If you have read these articles, you may have noticed that Photogrammetry takes time and money. Also, you may experience failures from unknown causes. This may be because your project parameters were too challenging. If so, maybe you can start with smaller and simpler steps. Yes, you can do photogrammetry without any possibility of failure. This means that you should spend less time and money and keep your project manageable and simple. So, how should we start simpler?
Start with 8 Photos
How many pictures do you need to start photogrammetry? The answer is 2. This is the minimum amount needed to start a Metashape alignment. If you are using 3DF Zephyr, you need 3. Now, let’s see what the models look like when using the minimum amount of pictures.
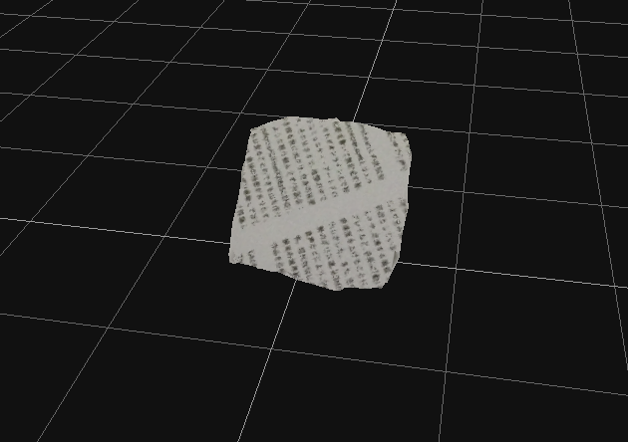
Hmm… Difficult to comment on.
As you see, a model can be created, but it’s hard to see what the original object was. We cannot use this for any artwork.
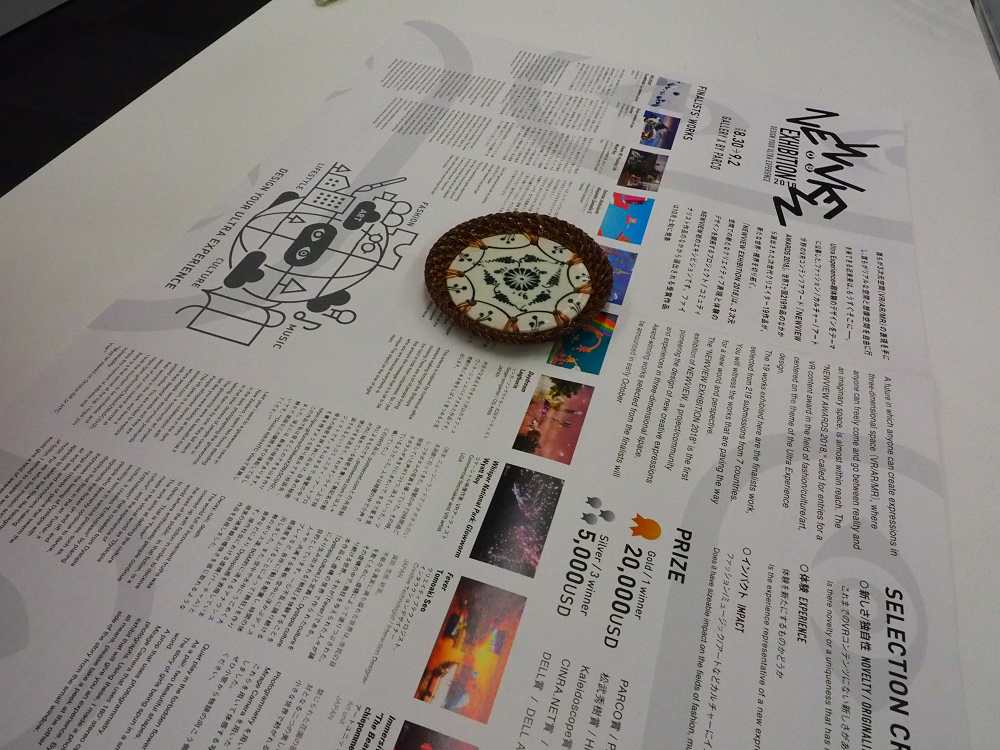
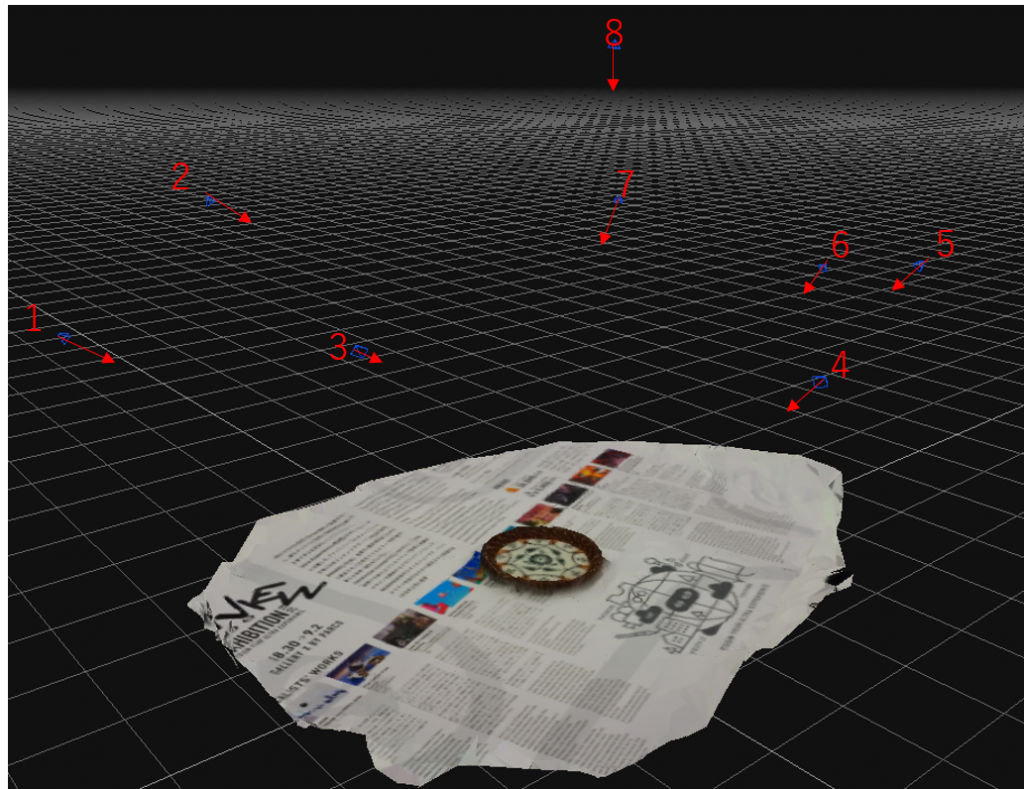
The question becomes, what is the minimum amount of pictures needed to create a clear and understandable model? The answer is 8. Ok, let’s see a sample model created from 8 pictures.

We can now see that the model is a coaster on top of a flyer.
As you see, we can now clearly recognize the model. But you can also see that the back is extremely hollow. We can see that 8 is the number to create a reliable model from 1 direction.
Of course, using 8 pictures is very dependent on the object(s) for the model. If the original object is large, it tends to need more, but small objects can be created with 8. Let’s look at different sized sample models created from 8 pictures.
Photogrammetring Small Objects
The procedure of photogrammetring should be as follows.
- Decide what you want to take photos of
- Photographing
- Creating a model using a photogrammetry tool
An important point is to imagine how to take the photo according to the model. In other words, to have a set of rules to follow.
Photographing Rules
No matter what you choose to photogrammetry, you need to follow some basic rules. For example, you need to take photos with 60% overlap. If you think of how you take photos, you could probably imagine how you should take photos with 60% overlap by moving parallel to the object.
Photographing with 60% overlap
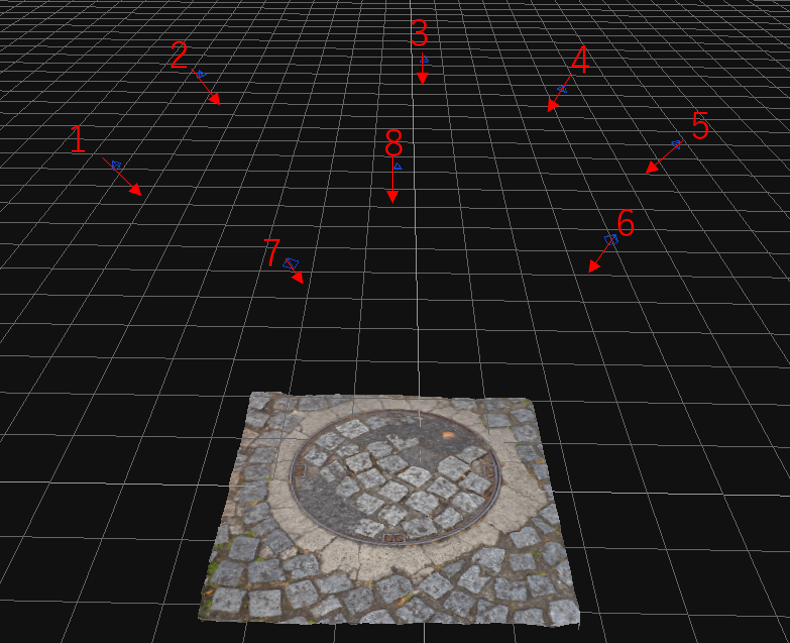
If you are taking pictures of a round object, how should you take photos of it? 60% overlap of a round object… is that even possible? Imagine taking the photo from a high angle. The near side should look larger, which will make the far side look smaller.
Taking a round object from a high angle
In order for a photogrammetry tool to recognize a object, the feature points need to be in sight with enough resolution. So, the near side information is much easier for the tool to recognize. For example, let’s say that the object is recognizable for 90 degrees from the picture center. Then, we need to take photos with 60% overlap of the side within the 90 degrees. Which means we need a photo for each 90°×60%=54°, so we need a total of 360°÷54°=7 pictures. In order to create a good looking texture map, add a photo from direct above, resulting in a total of 8 pictures. Yes, the amount of pictures needed to create a reliable model from one side is 8 pictures.
If you just need one side to be reliable, you only need 8 pictures
Models and Sample Creations
Here, I want to introduce some models and sample creations using this way of thinking.
This is a manhole cover.
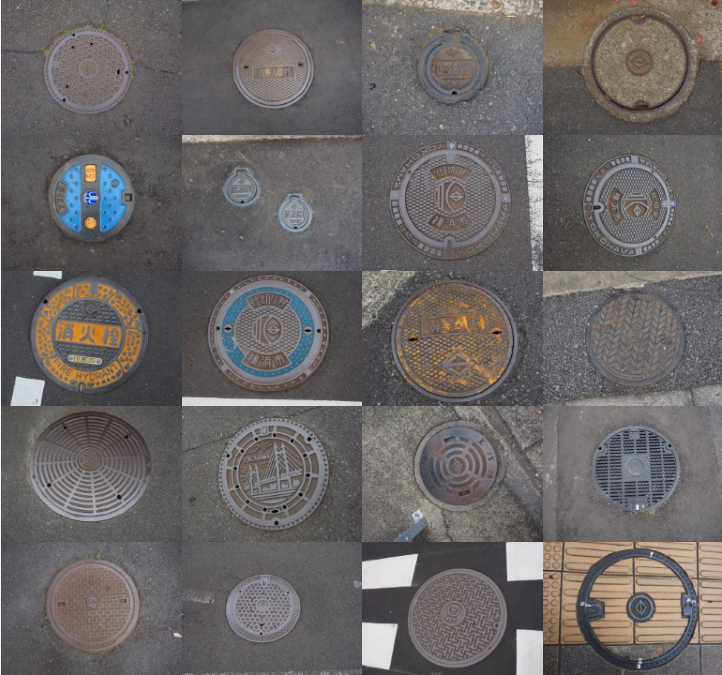
Existing anywhere.
There are no limitations to manhole cover designs by JIS standards, so there are thousands of different manhole covers in Japan. If you take a walk, you can see them everywhere, and even if they have the same design, the look will differ according to wear. Worn out ones are sometimes swapped for new ones, and they are well suited to use as photogrammetry models since they are never scarce. Also, people only see manhole covers from one side even in everyday life. There is no need to create a back side, so for photogrammetry, you only need to create one side, making it an even more perfect model to use for 8 picture photogrammetry.
This is a photogrammetry sample created using the above rules and techniques, taking photos of the manhole cover from 7 directions and 1 from above. It is a small enough model, and there is no back mesh, so even if you decrease the polygons to 5000 when creating the texture map, it is still recognizable.
The rough surface is recognizable too if you have 8 pictures
Now we have the created model using the 8 picture techniques and rules described above. The result created by photogrammetry is this. Our rules for this tutorial are strict, but it is well suited to finding out how much detail we can get. It is important that we are able to recognize the result as a manhole cover. Please check it out in VR.
How to Shorten the Time Invested Using a Photogrammetry Tool
In ”Manhole cover maniac”, there are about 30 manhole lids in the scene. I actually took photos of 67 lids before I finished this scene. In other words, I used the photogrammetry tool at least 67 times to create a model. You don’t have to be worried about the time it is going to take. I used only 8 photos for each model, so the modeling process didn’t take that much time. If you get better at handling the tool, then you can shorten the processing time even more.
If you are using 3DF Zephyr, first create a low density point cloud before modeling. Boundary box setting is what you call Region for metashape. The boundary box setting makes it so that no high density point cloud is created outside the box, so the processing time gets shorter with it. I experimented on how much time is reduced using 3DF Zephyr. The computer I used is GPD Pocket2 (CPU:m3-7y30, RAM:8GB), which has almost the same machine power as a MacBook 2017.
| 3DF Zephyr | With Boundary Box Setting | Without Boundary Box Setting |
|
Create Low Density Point Cloud |
1 minute and 1 second |
1 minute and 39 seconds (Boundary box settings included) |
|
Create High Density Point Cloud |
2 minutes and 1 second | 1 minute and 8 seconds |
|
Mesh |
5 minutes and 15 seconds | 3 minutes and 30 seconds |
|
Mesh with Texture Texture Size: 8192×8192、 |
4 minutes and 51 seconds | 54 seconds |
|
Total time |
13 minutes and 6 seconds | 7 minutes and 18 seconds |
| Created Model |
 Exported entirely |
 Inside of the boundary box is exported |
Even with the boundary box settings included, the result was pretty fast.
By the way, I experienced some failures as I made so many models. Let me introduce some of them.
Failure 1:Alignment is Not Recognized
Alignment is the process of sorting out the photos by the angle they were taken from. If you only take photos from one side and the alignment fails, you should suspect that the photos aren’t taken properly. In other words, the object being out of focus or camera shake is highly suspected. The next likely case is failure due to light reflection. Since the manhole covers are made of iron, there is some amount of reflection. In the sample below, both camera shake and light reflection is occurring, and the photo was a failure. It’s hard to recover such a photo and it is quicker to take another photo properly. The good thing is manhole covers do not run away.
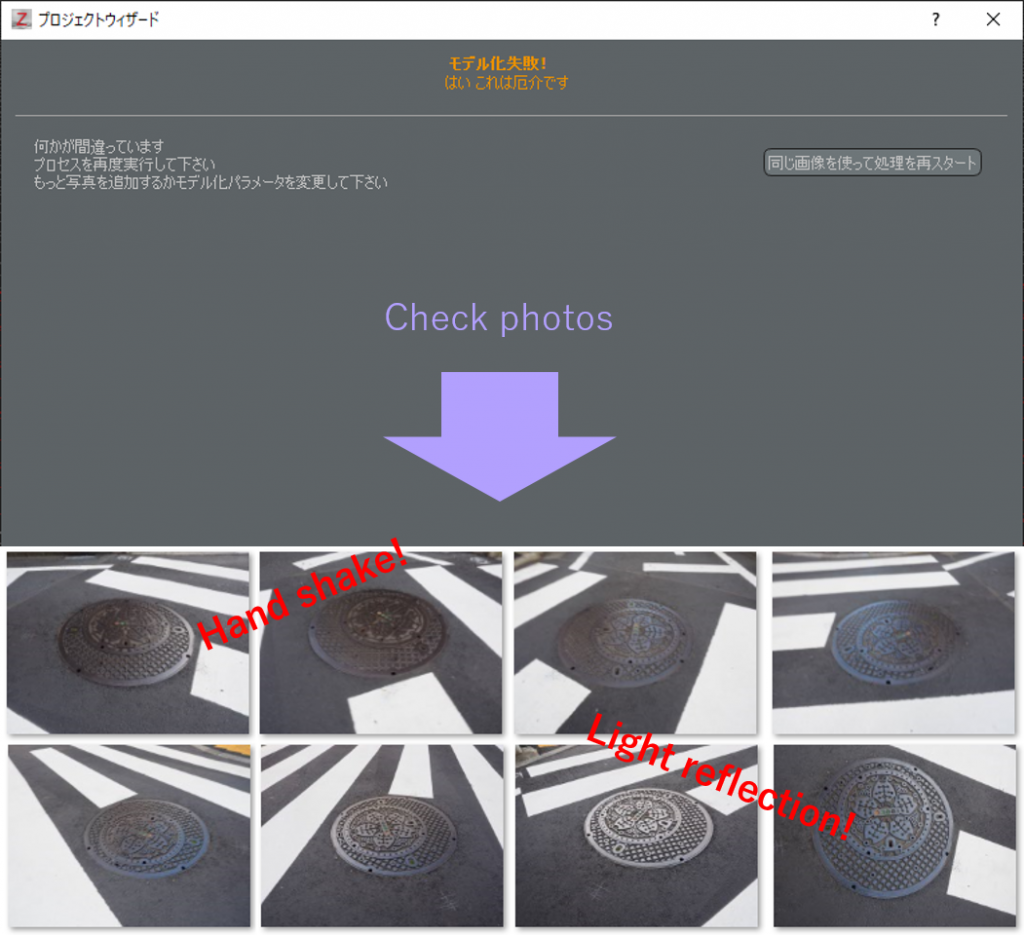
Alignment failure because of camera shake and light reflection
Failure 2:After Alignment, Something is Wrong
The alignment succeeded, but the photo is misplaced from the proper place. When I tried to create a mesh with this data, a really weird looking manhole cover was created. This is an example of failure due to light reflection. The day that I took the photo was misty and wet. The whole area was reflecting light, not only the manhole cover, resulting in alignment misplacement. Lesson: Do not take photogrammetry pictures on a rainy day.
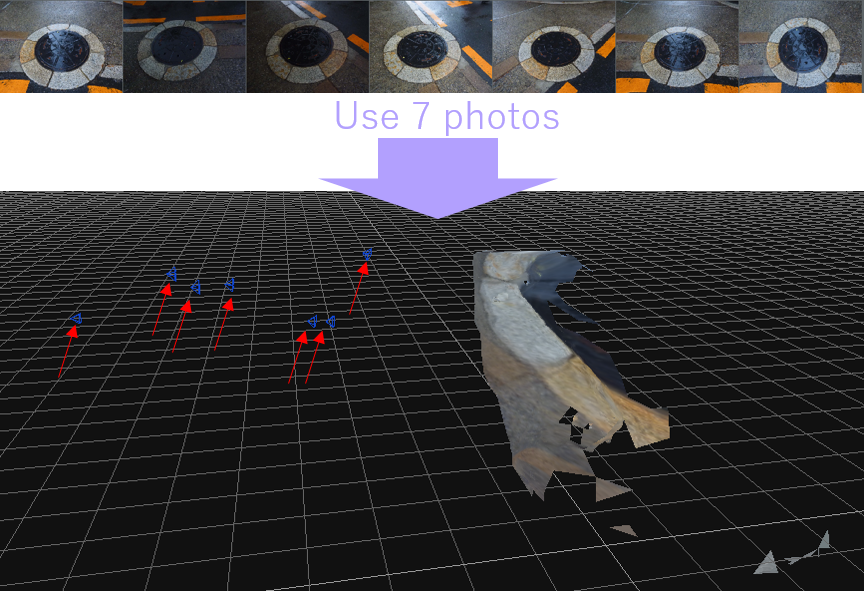
Photo alignment is misplaced
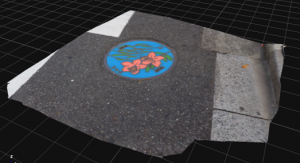
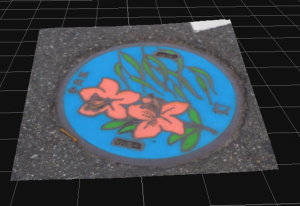
Failure 3:The Mesh was Not Created Properly
Since the alignment was a success, I created the mesh, but the result was not what I was expecting. This is another case where reflected light caused a failure. If the positions are not recognized properly due to light reflections, this may happen. But you can also see that the manhole cover shape is somewhat recognizable. If the light reflection is as small as this and the photos were taken on a cloudy day, you can prevent such failures. Or if you can afford it, you can use a single-lens reflex camera with a PL filter.
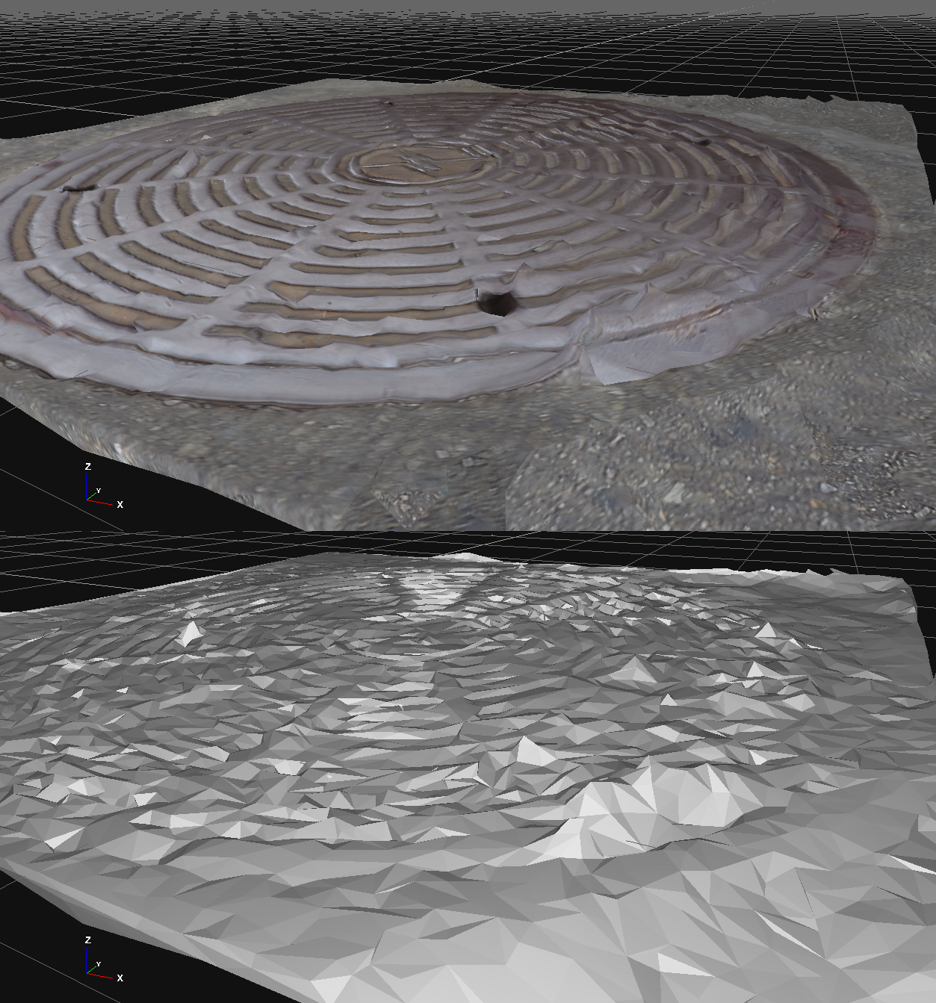
Failure due to light reflection
We have looked at small objects, but now I want to take a look at something larger.
Photogrammetring a Huge Scene
If you have gotten this far, you are probably interested in photogrammetry for a large scene. Yes, we need to make photographing rules that are suited to large scenes.
Photographing Rules
As I mentioned previously, 8 pictures can work for a one sided object. However, let’s try something like a house wall. If you are targeting a flat object, you need to take 60% overlapping photographs in a parallel direction. Let’s see how much area of a wall we can photogrammetry with 8 pictures. This is directly dependent on how much space we can capture in a single photo. For one thing, the lens counts, but also other physical circumstances such as not being able to take a distant picture from the wall due to being in a corridor can be a big obstacle. (A 360° camera is extremely useful for closed areas such as corridors, but this option is expensive and I would forget about this type of technology for now). This doesn’t mean that you need to take a wide angle photo. The texture map resolution and details such as the roughness of the wall will become worse. Let’s see some examples.
The first example is a large gate. I took this photo walking across a footbridge. I wasn’t able to reproduce the sky from the photo, but the gate looks rather solid. I took the photo while walking sideways, so the text on the gate was created nicely.
A gate at Rikodori, Numazu taken from a footbridge
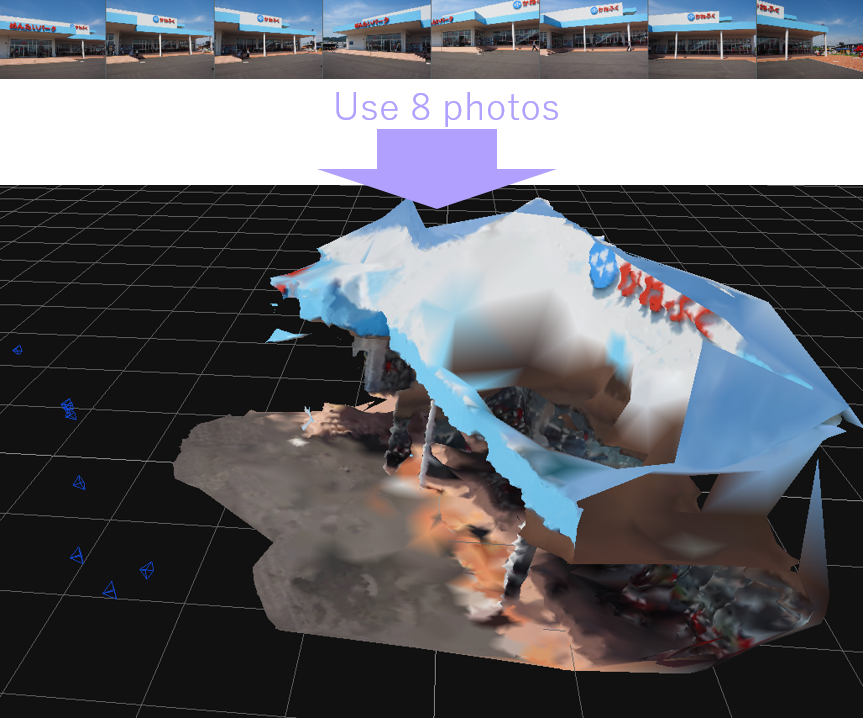
The second is of a shop on a street. The upper parts such as the billboard was not created since the photos lacked information, but you can still feel the atmosphere of the shop.

A retro shop found on Numazu shopping street
Of course, as your target becomes larger, there will be more disturbance elements resulting in failures. Let’s see some failed examples.
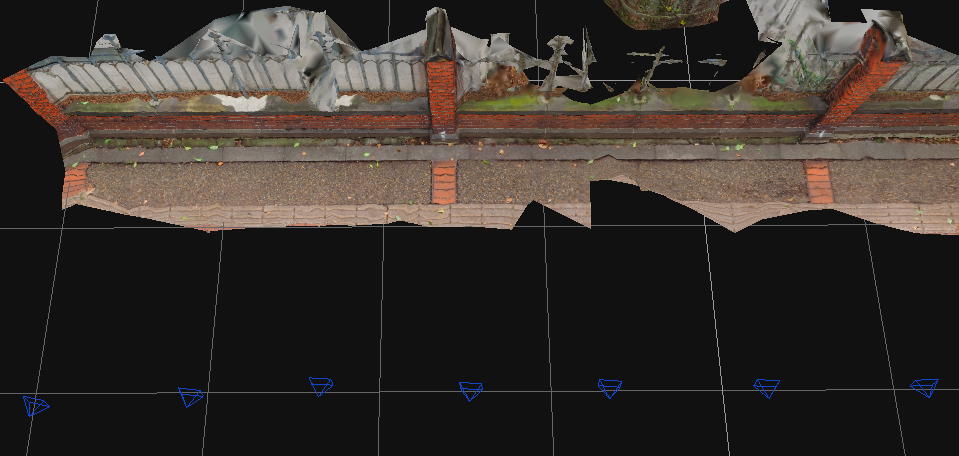
Failure 4:The Wall Becomes Distorted
This is a photogrammetry of the front of a building. As you see, it looks like a ruin. If you look at the original picture, the sky is clear blue and the wall is single colored, resulting in extremely few focus points. Another problem is that in the photo there is glass that changes color according to the angle, which is an enemy to photogrammetry. If the wall is affected by whiteout due to good weather, you could lower the camera exposure (EV), or quicken the shutter speed to prevent whiteout from occurring. You can also see that there is a large hole in the roof. I focused on taking the whole picture, so there are sides that are not visible in the pictures such as under the eaves. If you want to reconstruct the whole building, we need to change our rules. Architecture has many surfaces, so you should think about taking at least 8 pictures for each surface.
It does look like a building, but we cannot use this
Conclusion
I made a summary of what we learned about the 8 picture rule for photogrammetry.
- This technique can be used to capture a 1 sided object for photogrammetry.
- We only take 8 photos, so the photographing doesn’t take a lot of time.
- We only take 8 photos, so the modeling does not need massive computing power.
- Only 1 side is created, so the texture size and polygon number will be kept low.
- The photos are limited, so it is easy to find out the reason of failure.
- We can try and create a model frequently and easily, so you can learn more about the photogrammetry software quickly.
By the way, in games or animations, creators will not try to construct a manhole cover from 8 photographs and 5000 polygons. Of course not, it’s just an ordinary manhole cover. You might feel, isn’t a manhole cover just good enough with texture? If so, the manhole cover may not be suited for you. Please try to find an object that you feel could be perfect for photogrammetry! Find an object that you feel satisfied with, think about the rules you are going to follow, and take the photographs. If you fail in the alignment step, renew your rules. And again. If you focus on how many surfaces you need to create from the target, you will gain hints on how many photographs you will need.
How was this tutorial for photogrammetring with 8 photos? I hope you have learned how you can do photogrammetry without using too much time and money, and develop a process that is understandable for yourself. All you need to do now is start photogrammetring!
If you consider using a photogrammetry model in STYLY, you will probably be curious about how unneeded backgrounds or garbage data gets included, and if the whole model is fit enough. You can always edit the created model using the photogrammetry tool. In my next article, I will introduce how you can edit the model and make it look even better.