When using PlayMaker, the word “Variable” often appears.
It is very important when using PlayMaker.
In this article, I will introduce the int and float types of variables that are necessary when using PlayMaker, and how they are actually applied.
Sample Scene
This article will help you create the following scene using PlayMaker.
A scene in which the action diverges depending on the number of times a sphere is placed in a box.
Scene in which an object moves in a straight line
Scene in which an object rotates
Scene in which an object moves in a circle
Advance Preparation
Install the Unity plug-in PlayMaker beforehand.
![[Unity Tutorial] Creating a Game Using Playmaker ① From Basic Introduction to Installing](https://styly.cc/wp-content/uploads/2019/06/1200px-160x160.jpg)
If you are using PlayMaker for the first time, please read the following article in advance for a better understanding.
![[Unity] Starting Playmaker from Scratch](https://styly.cc/wp-content/uploads/2019/09/PlaymaerCoreConcept-160x160.png)
What is a variable?
A variable is like a named box that can hold numbers, letters, etc.
In PlayMaker, there are many situations where you need to hold numbers, letters, etc. In such cases, you can name them as variables yourself and put numbers, letters, etc. in them.
And putting a number, letter, or other value into a variable is called an assignment.
Also, since a variable can hold only one value, if there is already a value in the variable when you make an assignment, it will be overwritten by the value you are assigning.
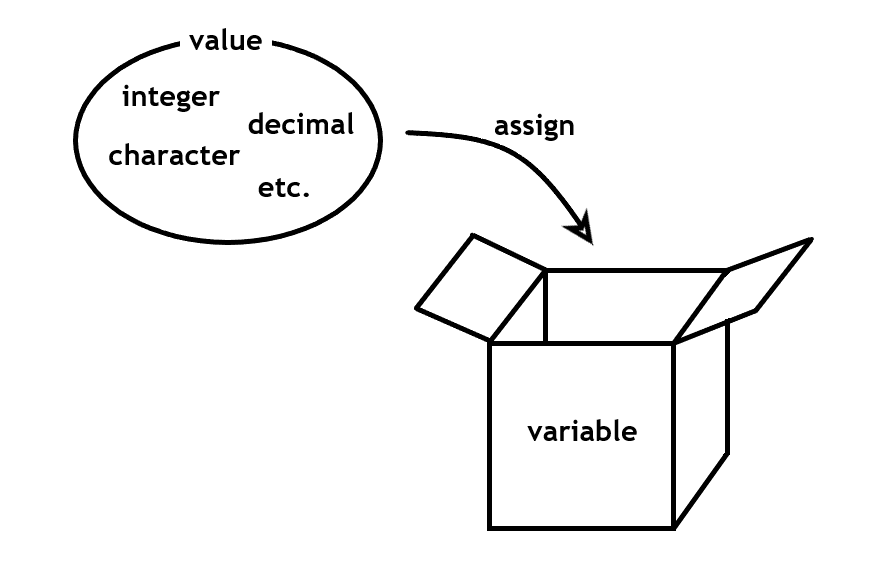
Diagram of a Variable
The int and float types explained in this article are one type of variable, and each type has different values that can be held and different uses.
From the next section, I will explain in detail the values that can be held and the usage of variables of the int and float types.
int part
What is int?
int is a type of variable that can hold a single integer between -2147483648 and 2147483647.
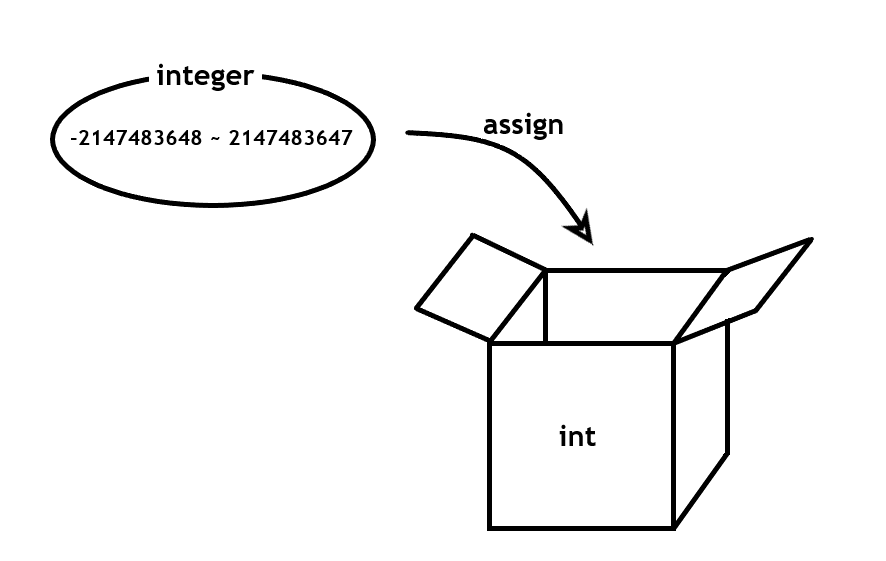
Diagram of a variable of type int
As described below, calculations with float types are not always exact and may have errors, but calculations between int types require exact values.
Therefore, when performing calculations that require rigor, the int type is more suitable than the float type.
Also, the initial value of a variable of type int in PlayMaker is 0.
Action of int
The following are some of the most important Actions that use the int type in PlayMaker.
Set Int Value
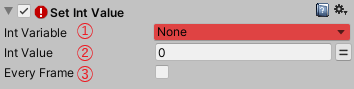
Set Int Value
This action allows you to assign a value to a variable of type int.
- You can select the variable to assign the value to.
- You can enter the integer to be assigned. You can also select a variable for an integer by pressing the equal sign to the right of the input field.
- If checked, this Action will be executed every frame while staying in this State.
Int Operator
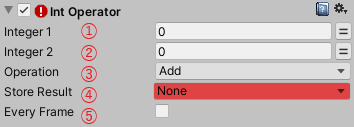
Int Operator
This Action can assign the four arithmetic operations between integers and the answers to the maximum and minimum values to variables of type int.
- You can enter the integer used for the calculation.
You can also select a variable for an integer by pressing the equal sign to the right of the input field. - You can enter an integer to be used in the calculation.
- You can also select a variable for an integer by pressing the equal sign to the right of the input field. In the case of subtraction or division, Integer 2 will be the number to subtract or divide.
The following variables can be selected: ③Add (addition), Subtract (subtraction), Multiply (multiplication), Divide (division), Min (minimum value), and Max (maximum value). - You can select a variable to save the result of the calculation.
- If checked, this Action will be executed every frame while staying in this State.
Int Clamp
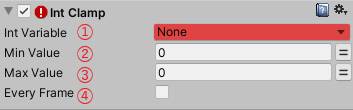
Int Clamp
This Action sets the minimum and maximum values, and if the value of the variable of the selected int type is less than the minimum value, the minimum value is assigned to the variable, and if the value of the variable of the selected int type is greater than the maximum value, the maximum value is assigned to the variable, thereby making the value of the variable greater than the minimum value and less than the maximum value.
- The variable to be assigned to can be selected.
- You can enter the minimum value.
You can also select a variable for the minimum value by pressing the equal sign to the right of the input field. - The maximum value can be input.
You can also select a variable for the maximum value by pressing the equal sign to the right of the input field. - If checked, this Action will be executed every frame while staying in this State.
Random Int
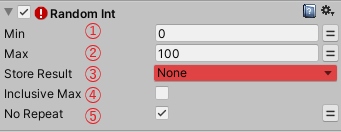
Random Int
This Action sets a minimum and maximum value and assigns a random integer between the minimum and maximum value to a variable of type int.
- You can enter a minimum value.
You can also select a variable for the minimum value by pressing the equal to the right of the input field. - The maximum value can be entered.
You can also select a variable for the maximum value by pressing the equal sign to the right of the input field. - You can select a variable to assign to.
- If you check the box, the maximum value will be included in a random integer.
- If checked, the same value will not appear consecutively when Random Int is repeated.
Int Changed
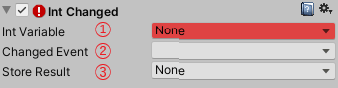
Int Changed
This action can either trigger the selected event when the value of the variable of the selected int type changes, or it can set the value of the variable of the selected bool type to True.
A bool type is a type that takes two types of values, True or False. This type is used when performing conditional branching.
- Variables for which changes are detected can be selected.
- You can select an event to be generated when the selected variable changes.
- You can select a variable of type bool whose value is set to True when the selected variable changes.
Int Compare
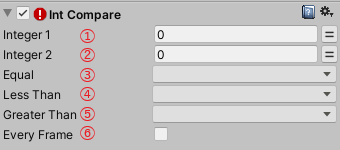
Int Compare
This action compares two integers (Integer1, Integer2) and fires for each of the three patterns: when Integer1 is equal to Integer2, when Integer1 is less than Integer2, and when Integer1 is greater than Integer2. You can select the action.
- You can enter the value of Integer1.
You can also select a variable for Integer1 by pressing the equal sign to the right of the input field. - You can input the value of Integer2.
You can also select a variable for Integer2 by pressing the equal sign to the right of the input field. - You can select an event to be fired when Integer1 is equal to Integer2.
- You can select an event to be fired when Integer1 is less than Integer2.
- You can select an event to be fired when Integer1 is greater than Integer2.
- If checked, this Action will be executed every frame while staying in this State.
Int Switch
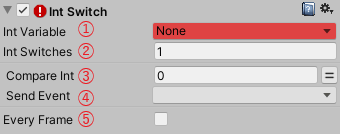
Int Switch
This Action can generate different events depending on the value of a variable of type int.
- You can select a variable.
- The larger this value is, the more combinations of Compare Int and Send Event will be generated.
In the image above, the number is set to 1, so there is only one combination of Compare Int and Send Event, but as you increase the number, it changes as shown in the image below.
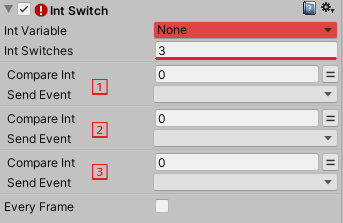
Int Switch
3. You can enter an integer for when the event occurs.
4. You can select which event will be fired.
5. If you check the checkbox, this Action will be executed every frame while staying in this State.
Application of int
Variables of type int are very compatible with branching behavior conditional on a number, using Int Compare and Int Switch as explained above.
In this article, we will introduce a gimmick that uses Int Switch to branch the behavior of a box based on the number of times a ball is placed inside the box as an application.
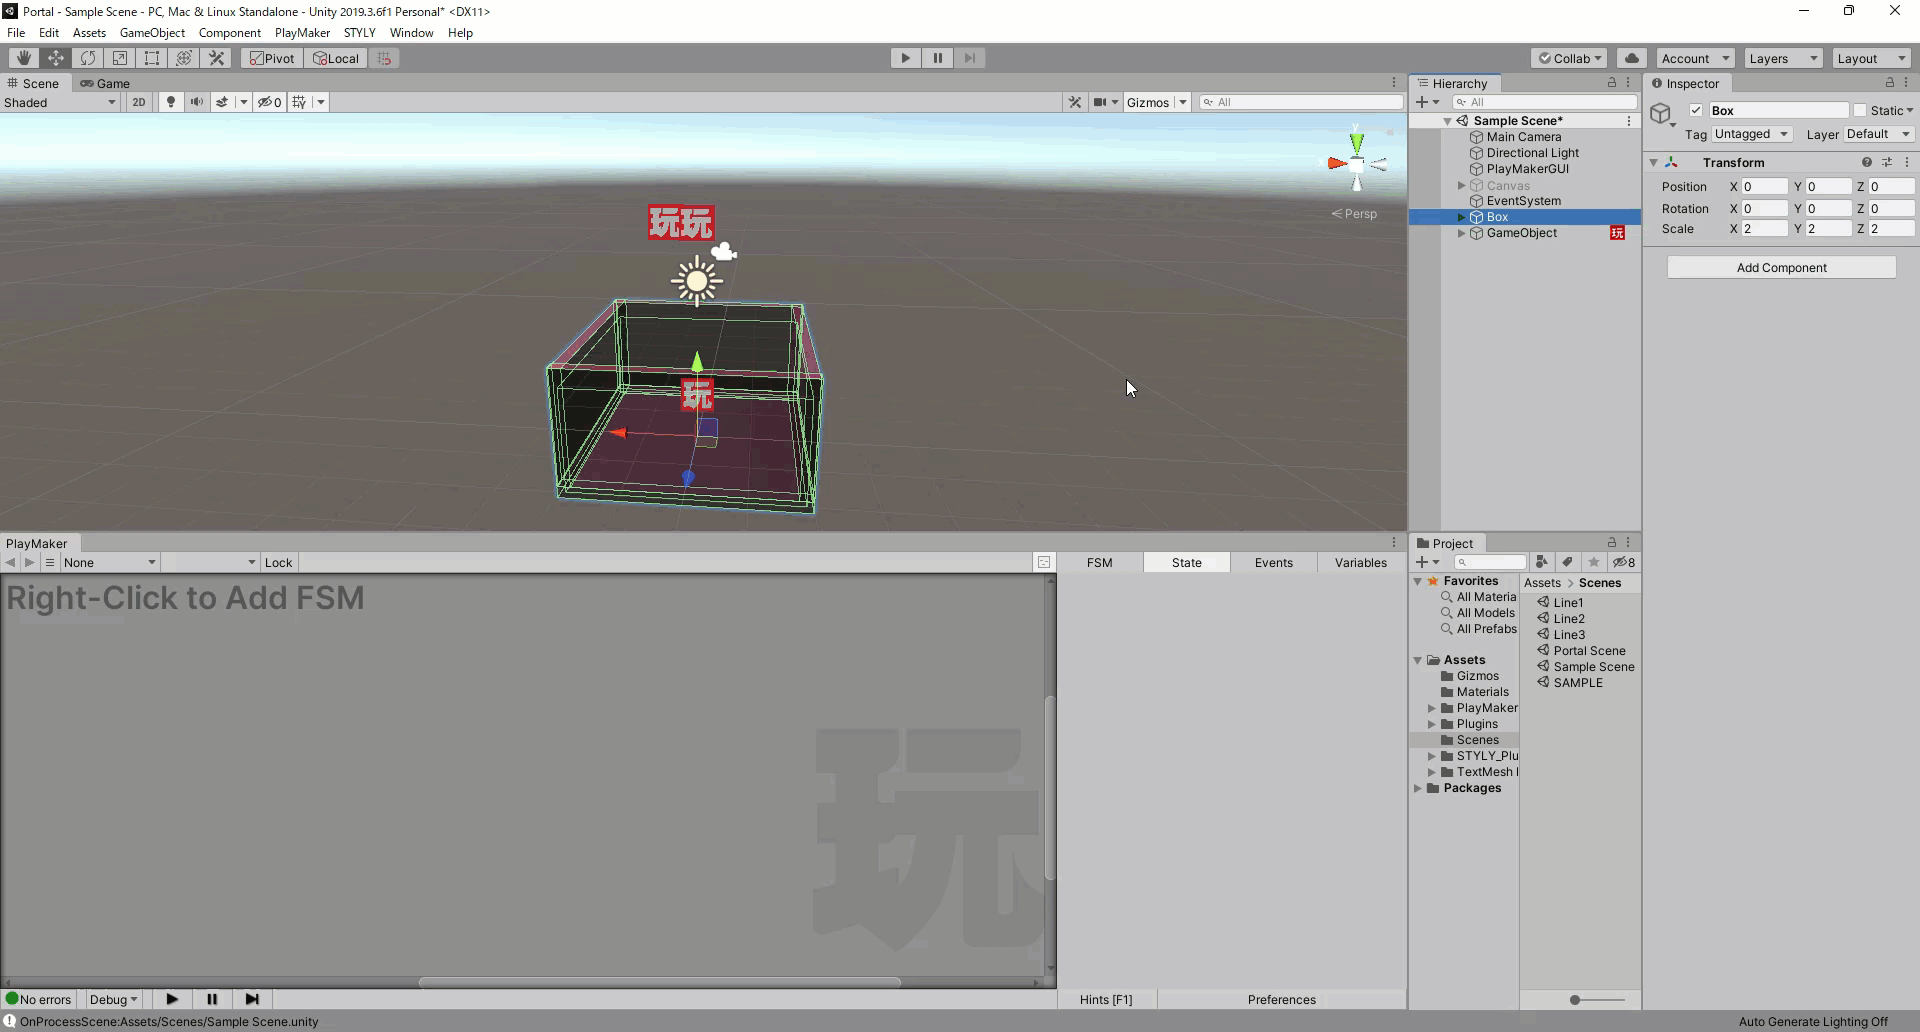
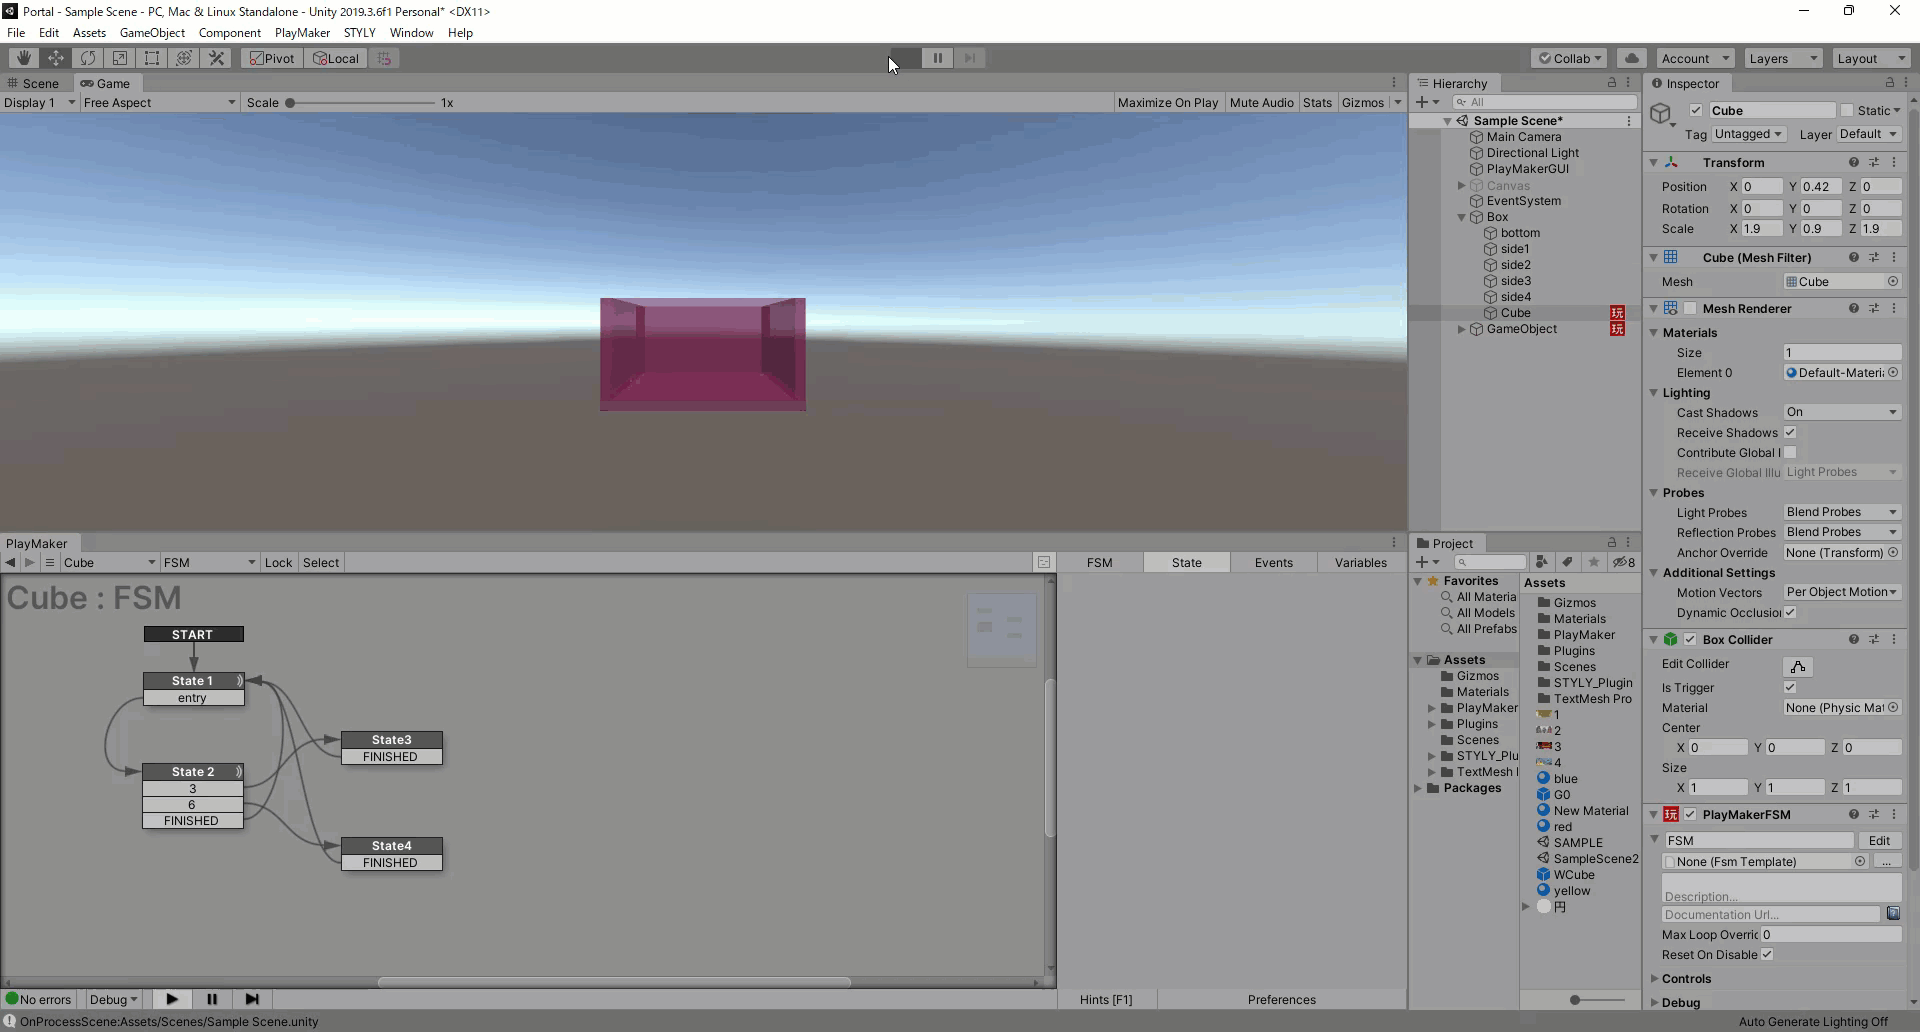
First, we will combine several Cubes to create a box without a top surface.
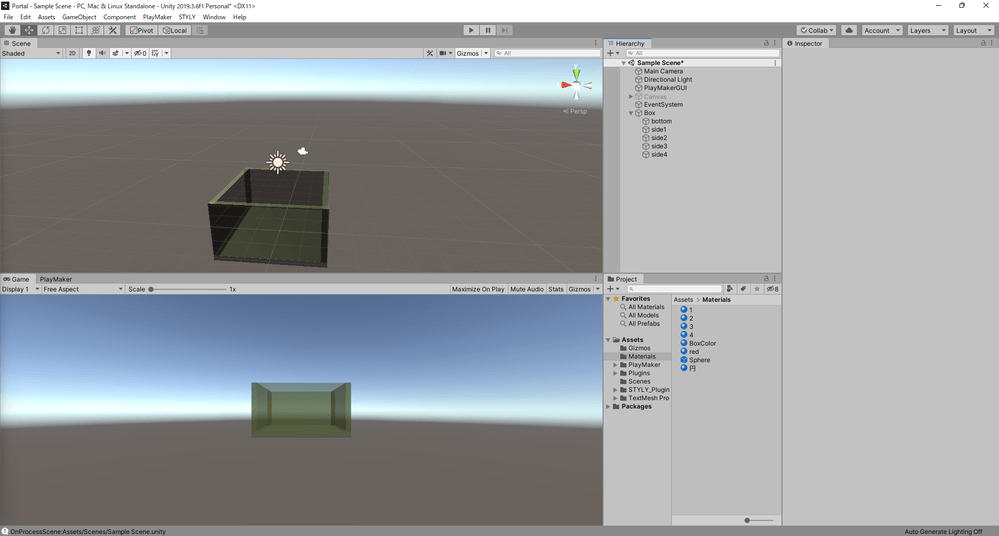
In the actual box Hierarchy, bottom is the bottom surface and sides 1 to 4 are the sides.
Place a Cube so that it fits into the box.
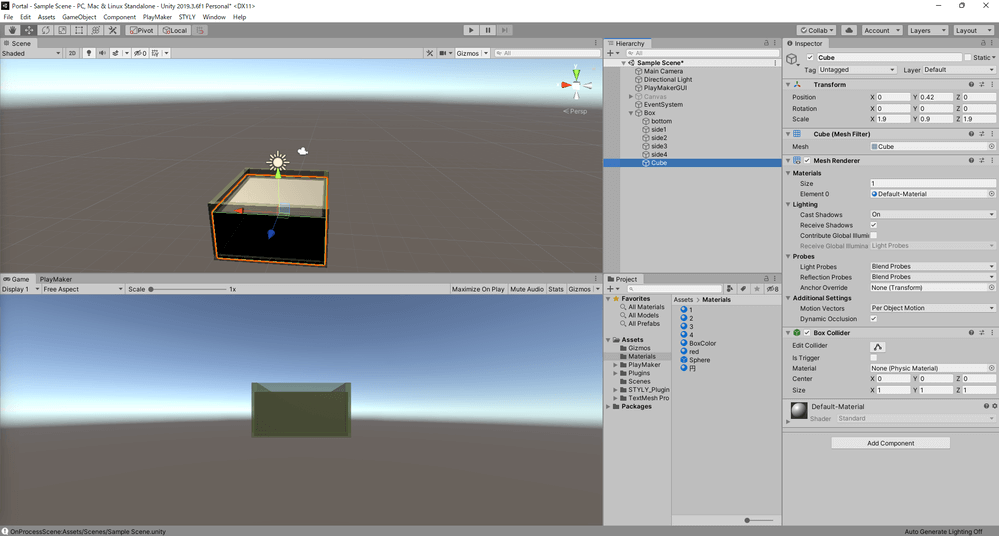
Place a Cube so that it fits into the box.
Disable the Mesh Renderer for the Cube you just created and check the Is Trigger box in the Box Collider.
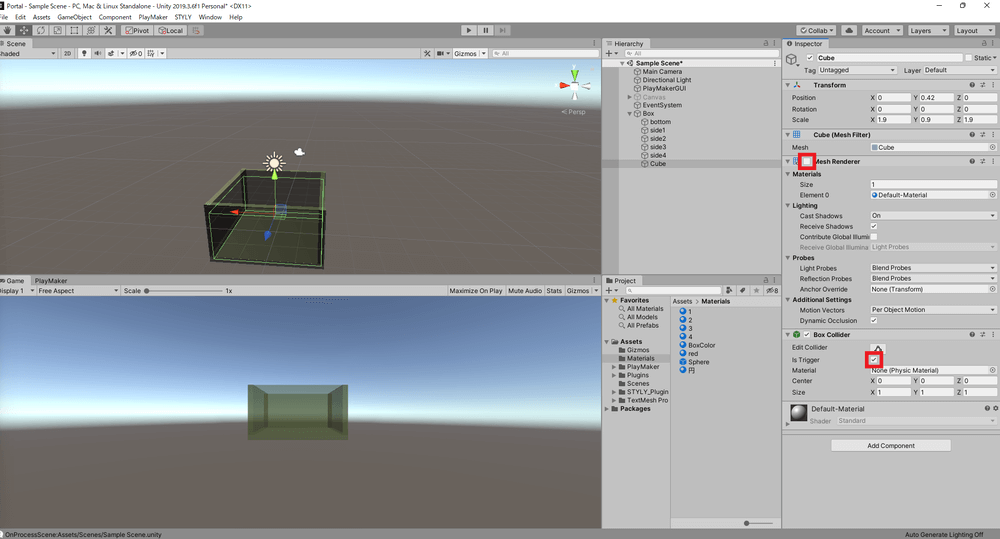
Disable the Mesh Renderer and check Is Trigger in the Box Collider.
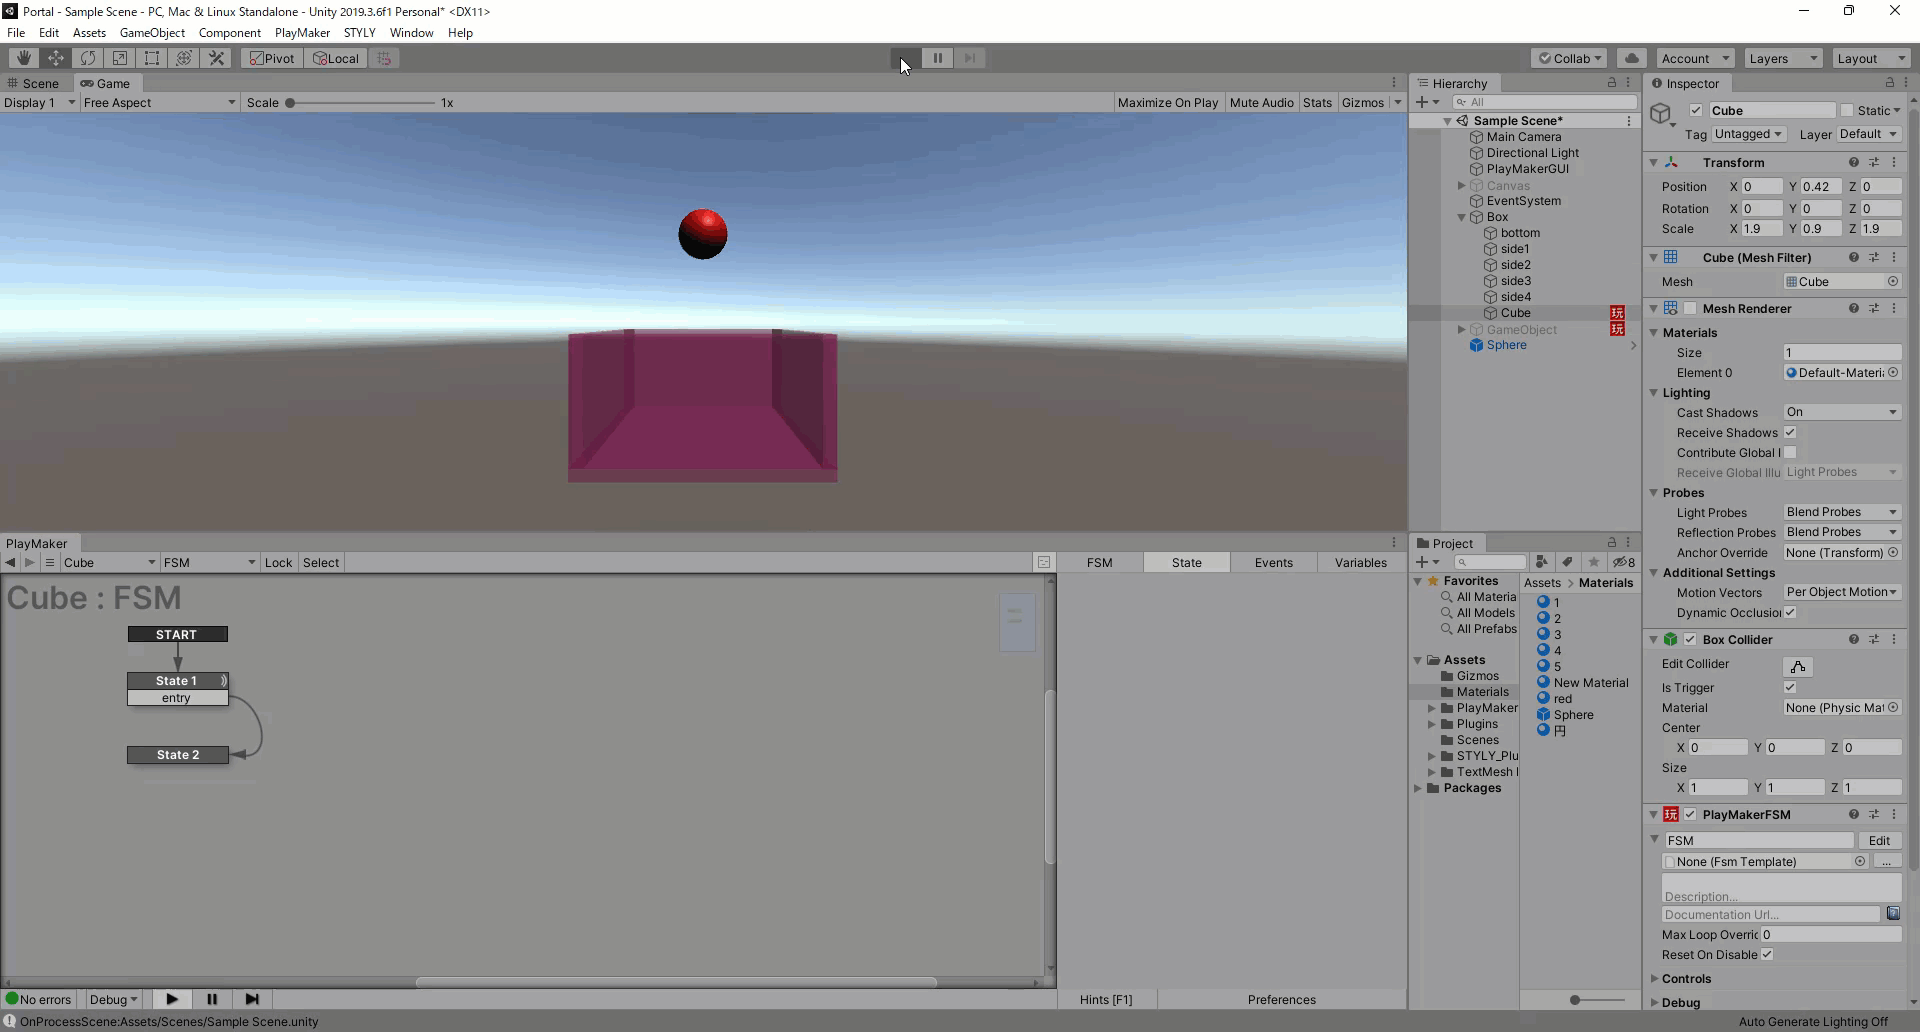
Add PlayMakerFSM to the Cube you created.
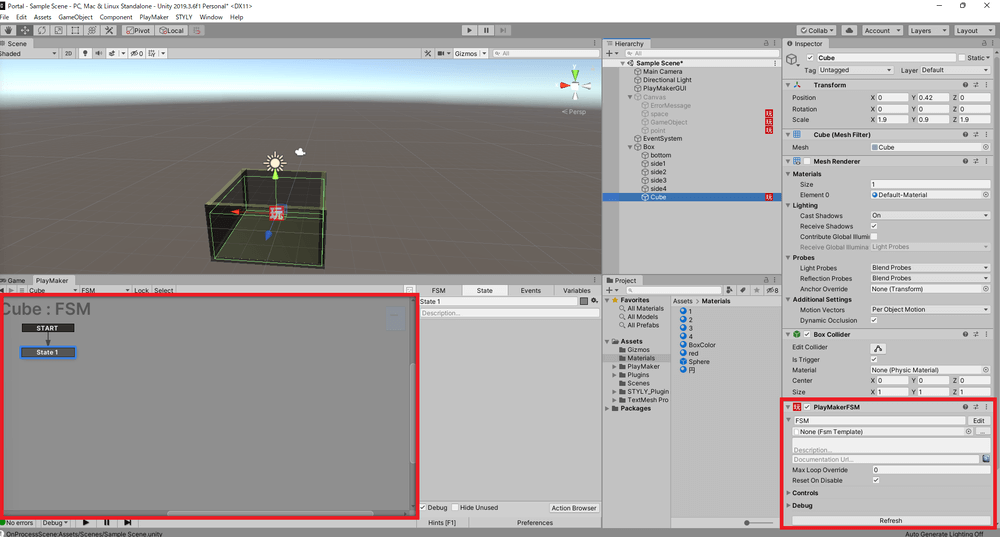
Adding PlayMakerFSM
Open the Action Browser and add “Trigger Event” to State1.
How to add Action
Create a new Tag and select it as the Collide Tag for Trigger Event.
How to create a new Tag
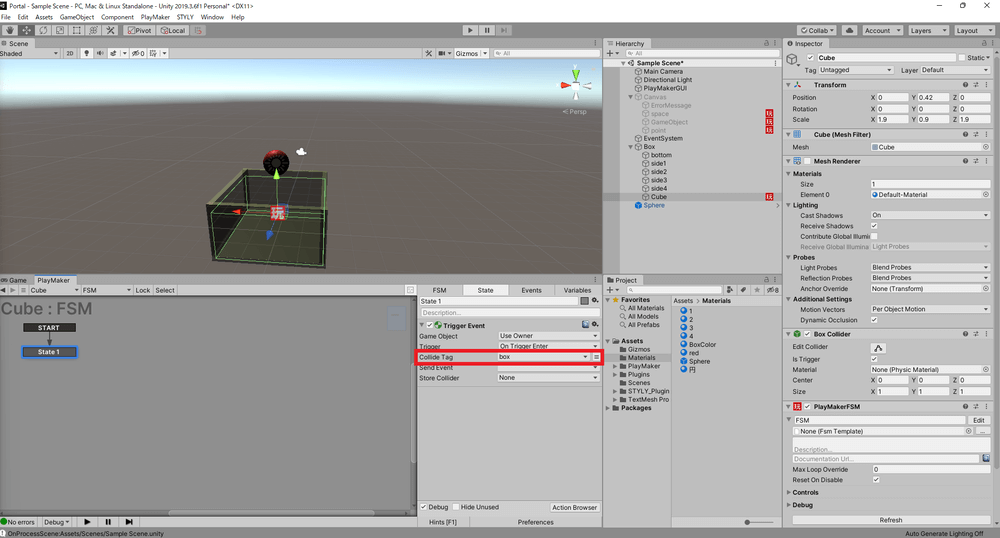
Select the Tag you created for the Collide Tag of the Trigger Event.
Add a new event “entry” to the Send Event of the Trigger Event.
Add “entry” to Transition of State1.
Create State2 as a new State and connect the entry of State1 to State2.
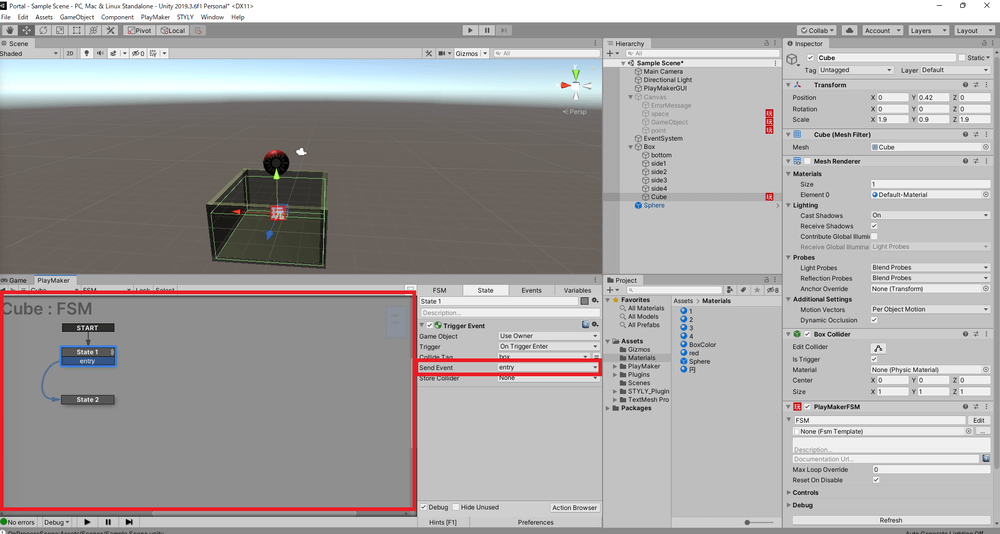
Create State2 as a new State and connect it from the entry of State1 to State2.
Now, when the newly created Tag-set object enters the Cube, an event entry is triggered.
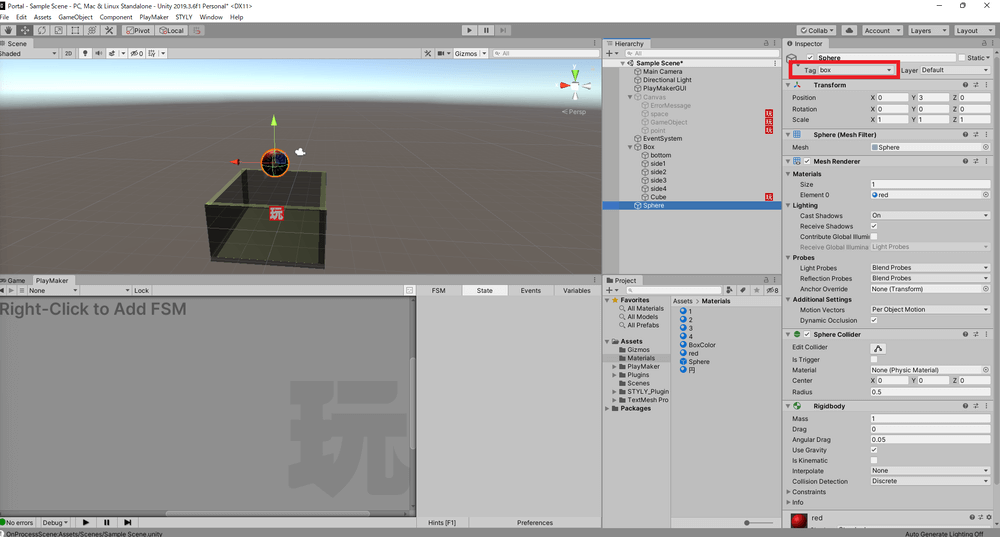
Sphere with Tag set
Actual Operation
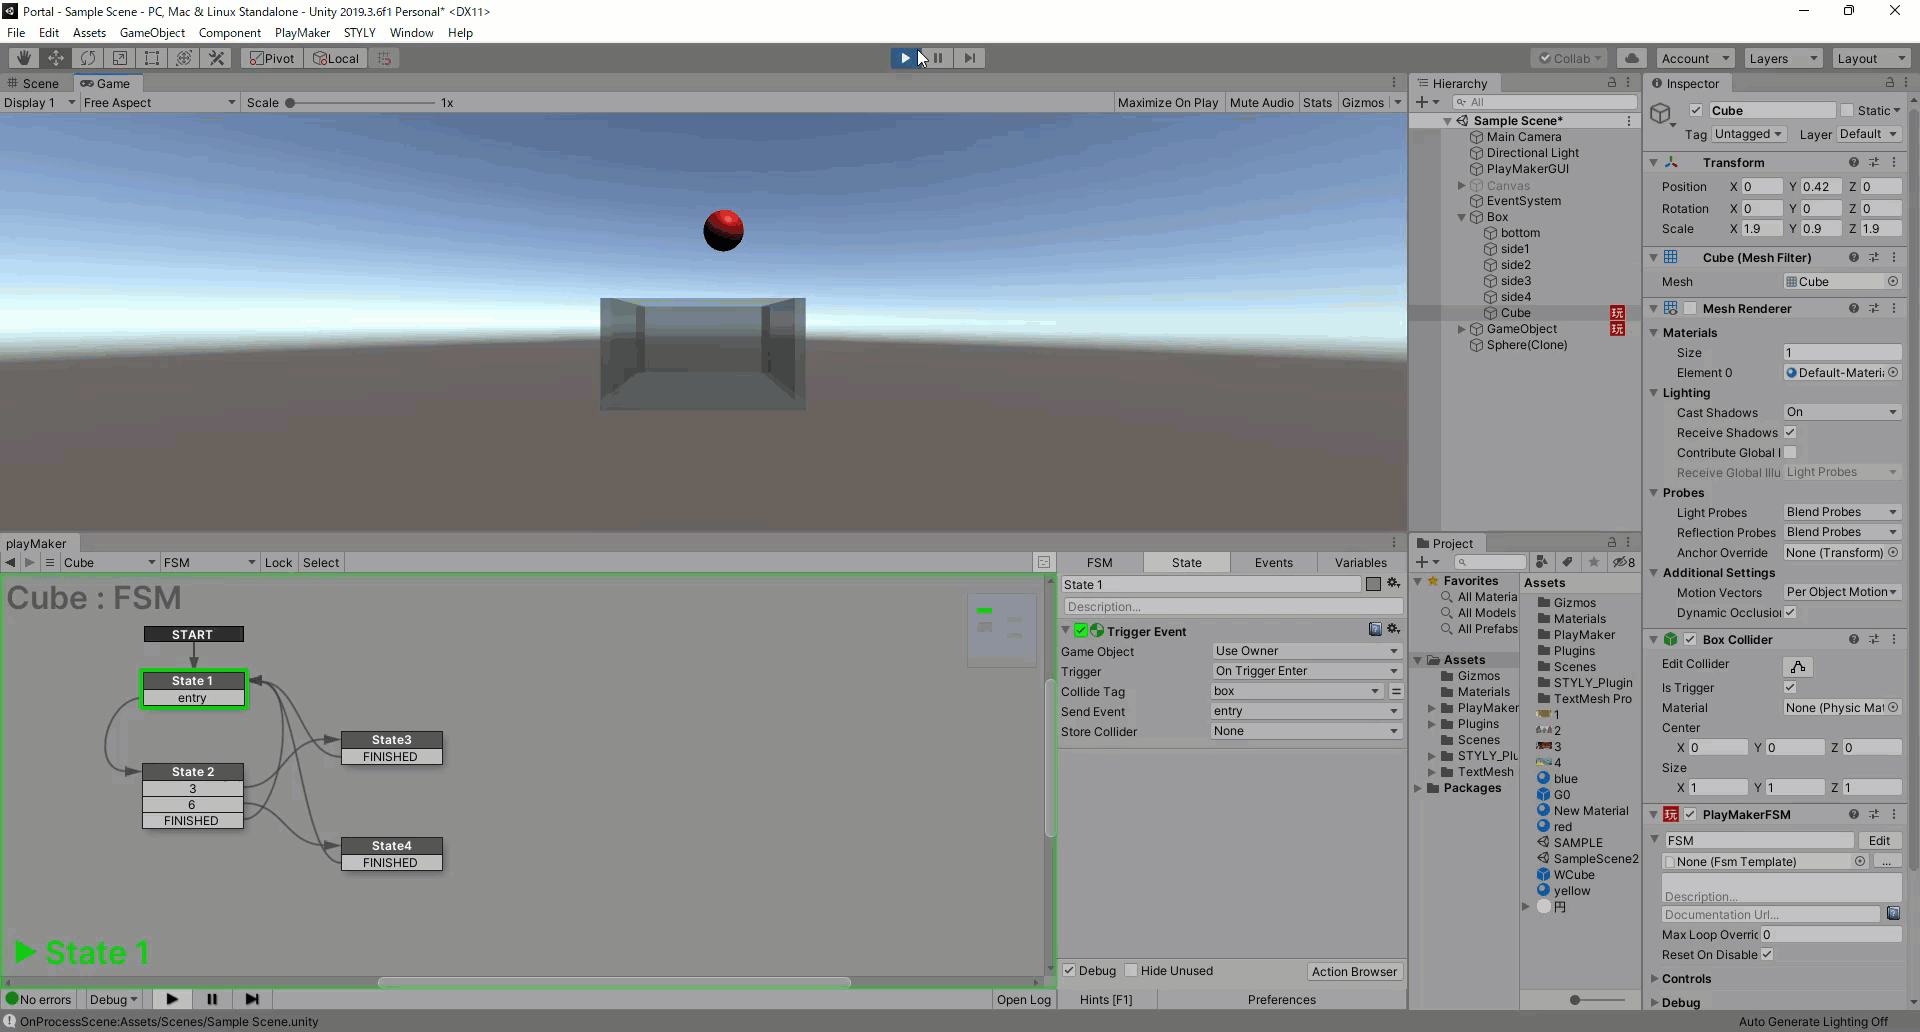
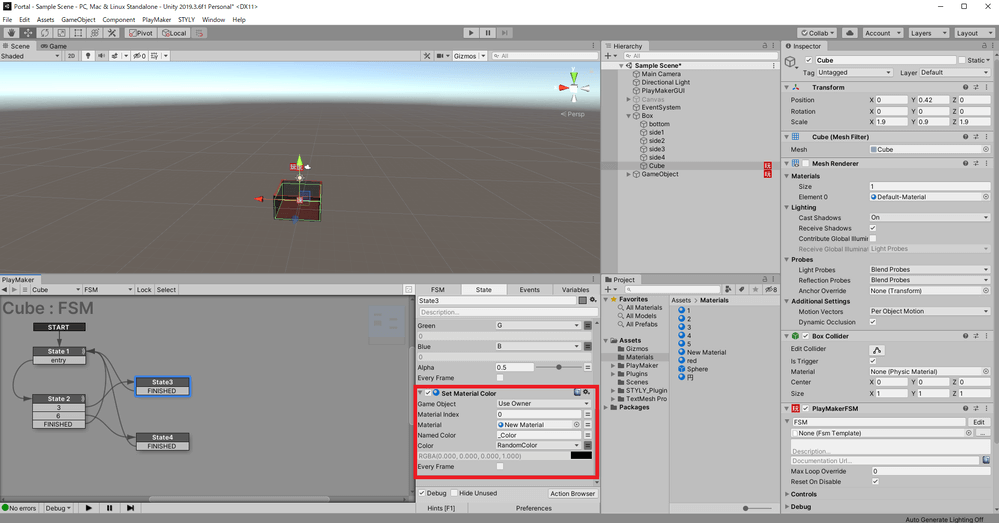
Open the Action Browser and add “Int Operator” and “Int Switch” to State2.
*Action is executed from the top, so make sure Int Operator is above Int Switch.
Select a new variable “counter” for Integer1 of Int Operator and enter 1 for Integer2.
Select the variable counter for Store Result.
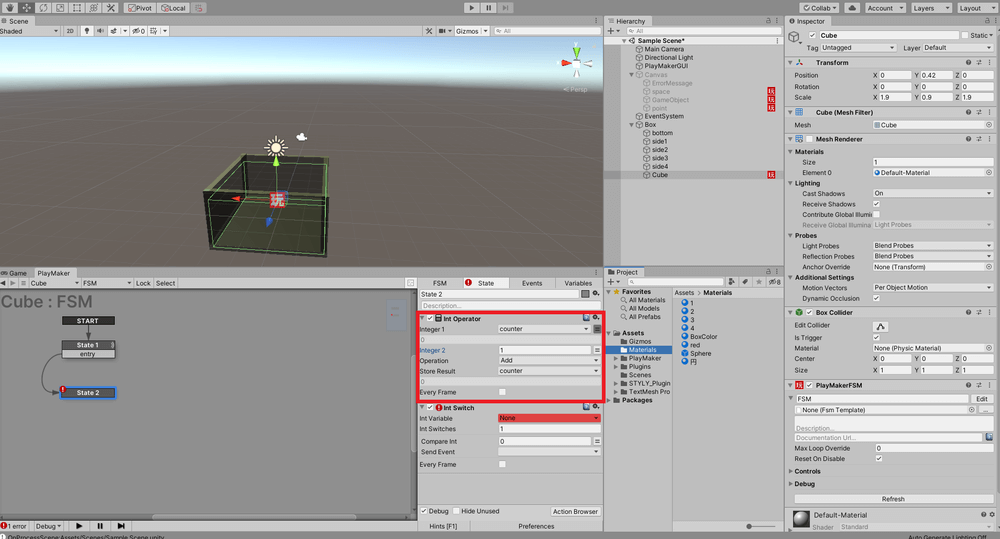
Set up the Int Operator.
Next, select the variable counter for Int Variable in Int Switch and enter 2 in Int Switches.
Enter 3 for the first Compare Int and select the new event “3” for Send Event.
Enter 6 for the second Compare Int and select the new event “6” for the Send Event.
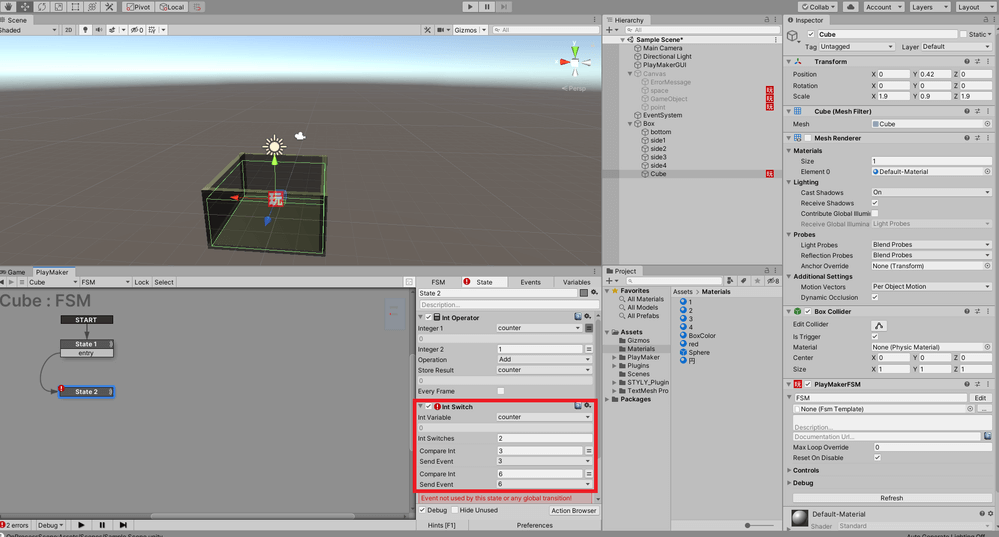
Set Int Switch.
Add 3 and 6 to Transition in State 2.
Create State 3 and State 4 as new States and connect from 3 of State 2 to State 3 and from 6 of State 2 to State 4.
Add Finished to the Transition of State2, State3 and State4 and connect all Finished to State1.
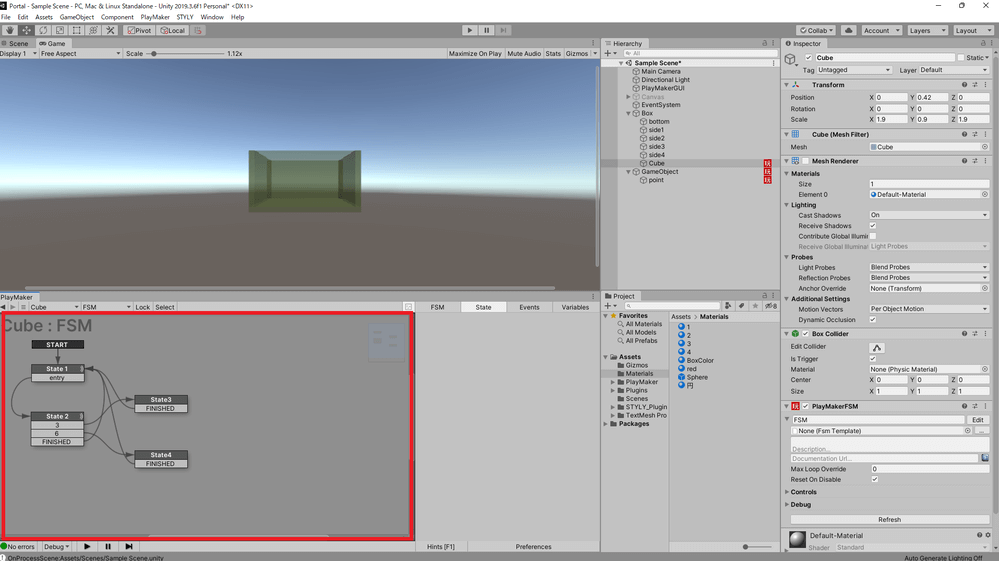
Setting up the Transition
Now the number of times the ball has entered the box is assigned to the variable counter, and a branching will occur at a specific number of times (in this case, the 3rd and 6th times).
Actual Operation
Next, we will create the part that occurs at the destination of the branch.
Open the Action Browser and add three “Random Float”, “Set Color RGBA” and “Set Material Color” to State3.
*Since Actions are executed from the top, Random Float, Set Color RGBA, and Set Material Color should be added in that order from the top.
For Random Float, enter 0 for Min and 1 for Max for all three, and select new variables “R,” “G,” and “B” for Store Result, respectively.
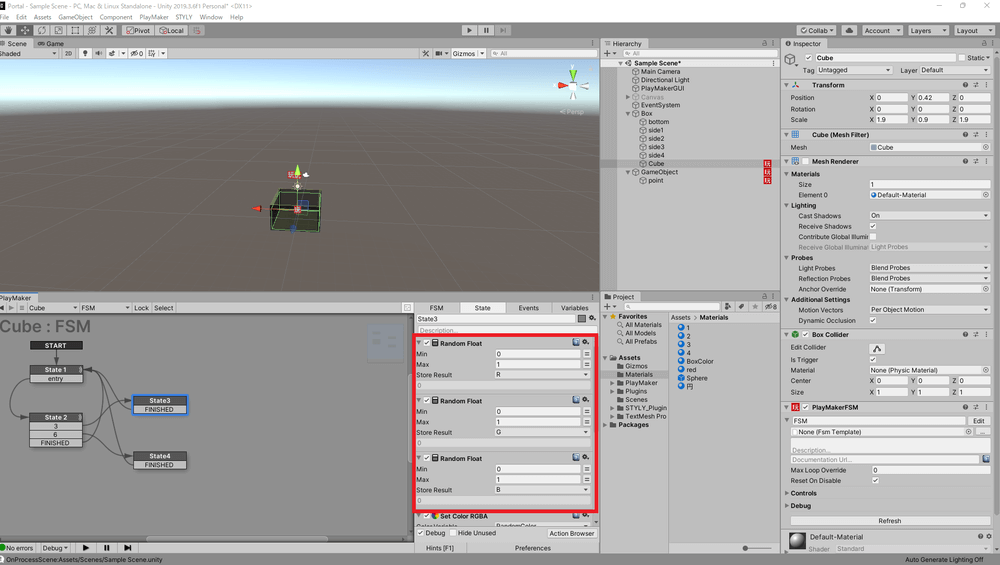
Set Random Float
Select a new variable “RandomColor” for the Color Variable in Set Color RGBA.
Select new variables “R,” “G,” and “B” for Red, Green, and Blue, respectively.
Enter 0.5 for Alpha.
Set Color RGBA
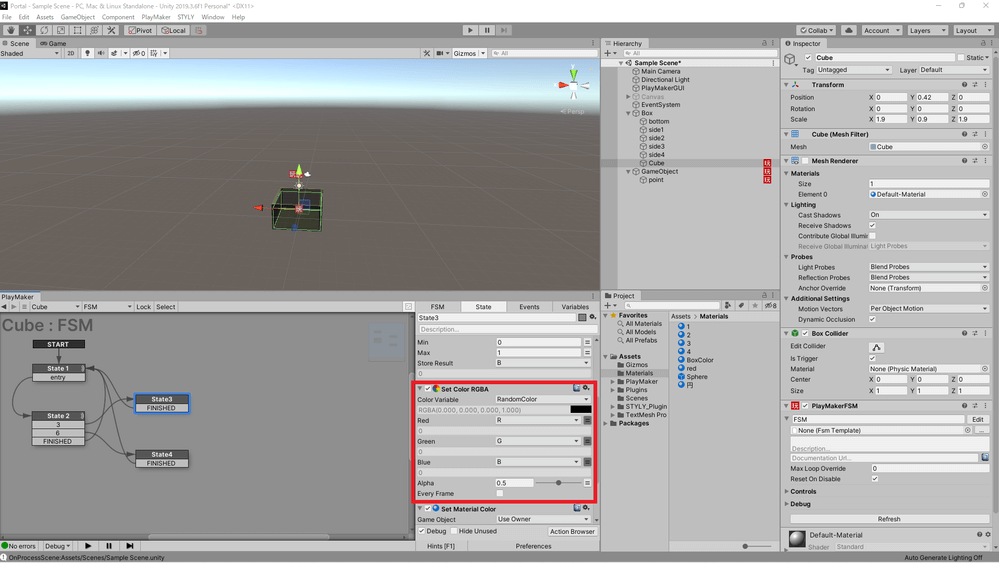
Right-click on the Project window and select Create → Material.
Change the Inspector’s Rendering Mode to Fade for the created Material.
Create Material
Apply the created Material to the box.
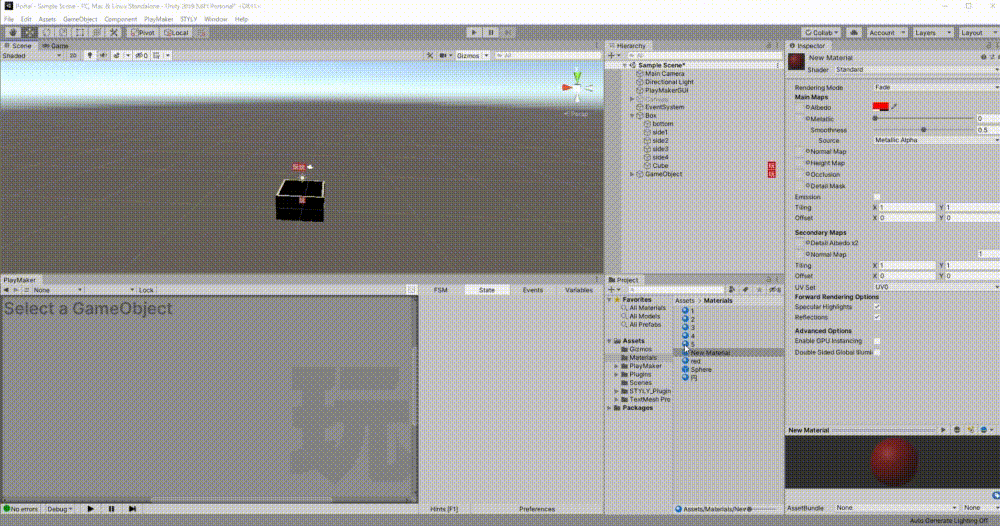
Apply the Material to the object.
Select the material you created for Material in Set Material Color.
Select the variable RandomColor for Color in Set Material Color.
Set Material Color
Open the Action Browser and add “Activate Game Object” to State 4.
Uncheck Activate under Activate Game Object.
Select the bottom of the box as the Game Object in Activate Game Object.
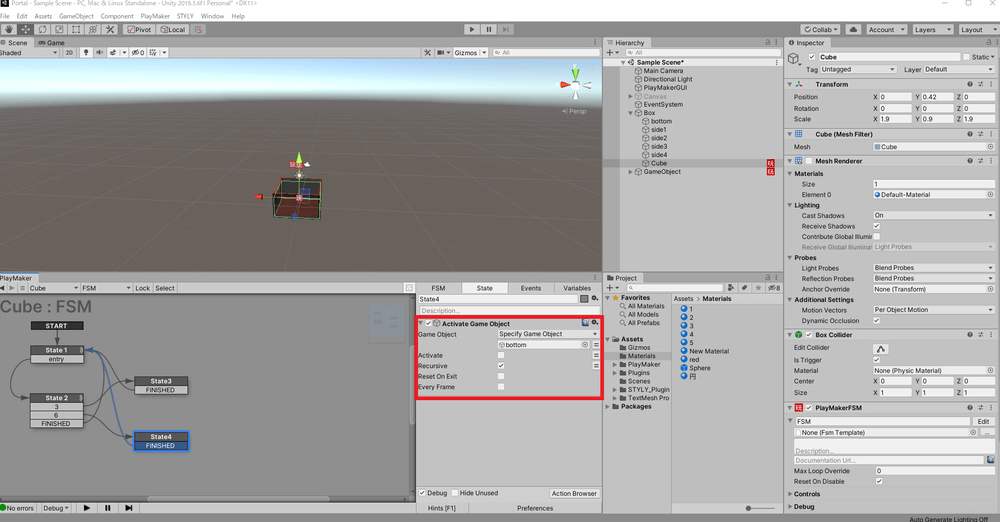
Set up the Activate Game Object.
Now the bottom of the box will exit when six balls are placed in the box so that the color of the box changes to a random translucent color when three balls are placed in the box.
Actual Operation
Thus, by using variables of type int to branch the behavior conditional on the number, we can bring about changes in the scene depending on the situation.
Let’s now look at what can be done with variables of type float.
float part
What is a float?
A float is a type of variable that can store a single real number with a precision of about seven significant digits. To put it rather crudely, it is a type that also includes non-integer numbers such as decimals.
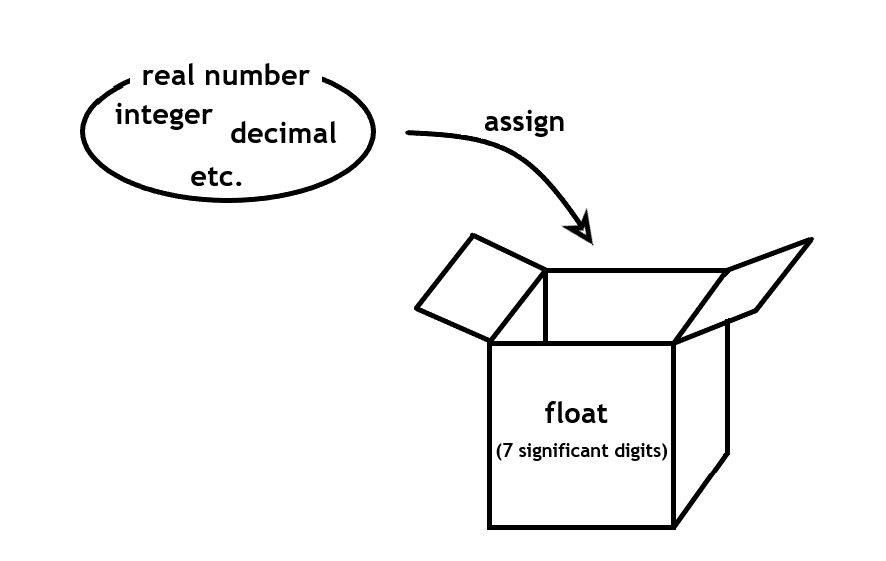
Diagram of a variable of type float
Unlike the int type, it supports a small number of values, so it can also contain values such as coordinates and angles.
The float type is very useful in PlayMaker because it can be used as a value for Position and Rotation.
However, the calculation using the float type is not always rigorous due to the specifications, and errors may occur.
The initial value of a float variable in PlayMaker is 0.
Action of float
The following are some of the most important Actions that use the float type in PlayMaker.
Set Float Value

Set Float Value
This action allows you to assign a value to a variable of type float.
- You can select the variable to assign the value to.
- You can enter the real number to be assigned.
You can also select a variable for the real number by pressing the equal sign to the right of the input field. - If checked, this Action will be executed every frame while staying in this State.
Float Operator
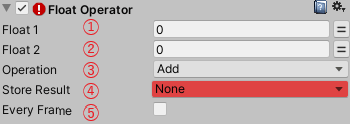
Float Operator
This Action allows you to perform four arithmetic operations between real numbers and assign the answers to the maximum and minimum values to a variable of type float.
- You can enter the real numbers used in the calculation.
You can also select a variable for the real number by pressing the equal sign to the right of the input field. - You can input the real number used in the calculation.
You can also select a variable for the real number by pressing the equal sign to the right of the input field.
In the case of subtraction or division, Float 2 will be the number to subtract or divide. - The following variables can be selected: ③Add (addition), Subtract (subtraction), Multiply (multiplication), Divide (division), Min (minimum value), and Max (maximum value).
- You can select a variable to save the result of the calculation.
- If checked, this Action will be executed every frame while staying in this State.
Float Abs

Float Abs
This Action selects a variable of type float and assigns the absolute value of the value of the selected variable to the selected variable.
- Variables can be selected.
- If checked, this Action will be executed every frame while staying in this State.
Float Clamp
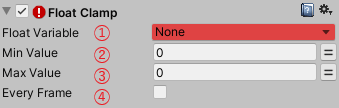
Float Clamp
This Action sets a minimum value and a maximum value, and if the variable of the selected float type is smaller than the minimum value, it assigns the minimum value to the variable, and if the variable of the selected float type is larger than the maximum value, it assigns the maximum value to the variable, thereby making the value of the variable greater than the minimum value and less than the maximum value.
- The variable to be assigned to can be selected.
- You can enter the minimum value.
You can also select a variable for the minimum value by pressing the equal sign to the right of the input field. - The maximum value can be input.
You can also select a variable for the maximum value by pressing the equal sign to the right of the input field. - If checked, this Action will be executed every frame while staying in this State.
Random Float
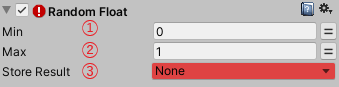
Random Float
This Action sets the minimum and maximum values and assigns a random real number between the minimum and the maximum to a variable of type float.
- You can enter a minimum value.
You can also select a variable for the minimum value by pressing the equal sign to the right of the input field. - The maximum value can be input.
You can also select a variable for the maximum value by pressing the equal sign to the right of the input field. - You can select the variable to be assigned to.
Float Interpolate
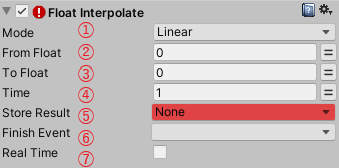
Float Interpolate
This action allows you to assign a value that transitions from the From Float value to the To Float value over time to a variable of type float.
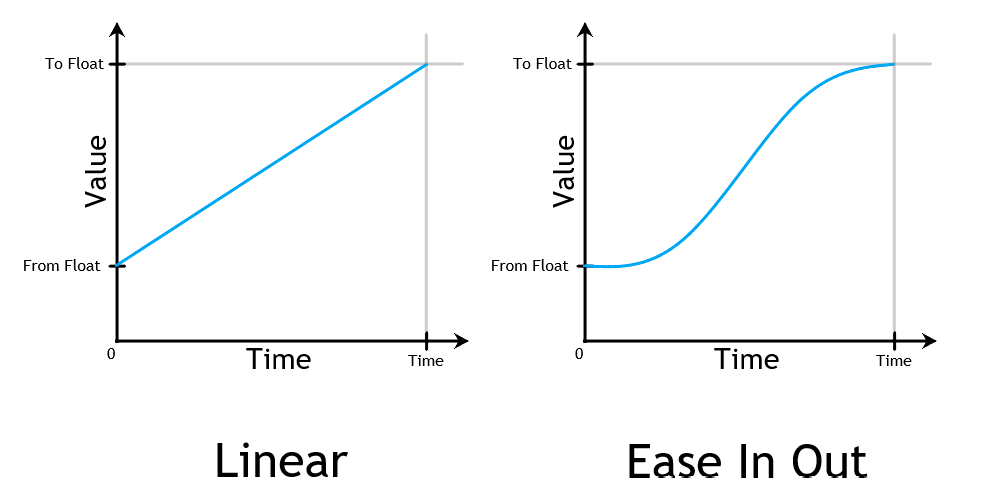
- You can choose how the value transitions with respect to time, Linear or Ease In Out.
The difference between Linear and Ease In Out transition is as follows.
Float Interpolate
Linear: The value changes at the same rate from the beginning to the end.
Ease In Out: The speed at which the value changes from the beginning to the end is slower.
2. The value before transition can be input.
3. The value after the transition can be entered.
4. You can enter how long it will take for the value to change.
5. You can select a variable to assign the value to.
6. You can select the event that will occur when this action is completed.
7. If checked, the length of the transition time will not be affected by the TimeScale in the scene.
Float Changed

Float Changed
This action can be used to trigger the selected event when the value of a variable of the selected float type changes, or to set the value of a variable of the selected bool type to True.
- You can select the variable whose fluctuation is to be detected.
- You can select the event to be fired when the selected variable changes.
- You can select a variable of type bool whose value is set to True when the selected variable changes.
Float Compare
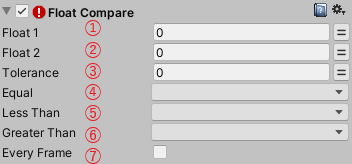
Float Compare
This action compares two real numbers (Float1 and Float2) and selects which action to take when Float1 is equal to Float2 within the margin of error, when Float1 is smaller than Float2, or when Float1 is larger than Float2.
- You can enter a value for Float1.
You can also select a variable for Float1 by pressing the equal sign to the right of the input field. - You can input the value of Float2.
You can also select a variable for Float2 by pressing the equal sign to the right of the input field. - You can also select a variable for Float2 by pressing the equal sign to the right of the input field.
- You can select the event to be generated when Float1 is equal to Float2.
- You can select an event to be generated when Float1 is less than Float2.
- You can select an event to be fired when Float1 is greater than Float2.
- If checked, this Action will be executed every frame while staying in this State.
Float Switch
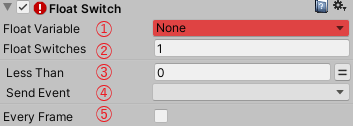
Float Switch
This action can fire different events depending on the value of a variable of type float.
- The variable can be selected.
- The larger this value, the more combinations of Less Than and Send Event will be generated.
In the above image, the number is set to 1, so there is only one combination of Less Than and Send Event, but as you increase the number, it changes as shown in the image below.
Int Switch
3. You can enter the event 4 to be triggered when the value is less than or equal to the value of 3.
4. You can select which event will occur.
*If you want to use multiple combinations of Less Than and Send Event, the higher the combination, the higher the priority of the branching, so please arrange the Less Than values in ascending order from the top.
5. If checked, this Action will be executed every frame while staying in this State.
Float Sign Test
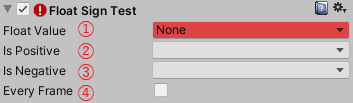
Float Sign Test
This action can fire different events depending on whether the value of the selected float variable is positive, zero, or negative.
- The variable can be selected.
- You can select an event to be fired when the value of the variable is positive or 0.
- You can select an event to be fired when the value of the variable is negative.
- If checked, this Action will be executed every frame while staying in this State.
Application of Float
Variables of type Float can take a small number of values and can be used as values for Position and Rotation.
In this article, I will introduce three gimmicks that use float variables to continuously move the coordinates and rotation of an object.
Linear motion of an object
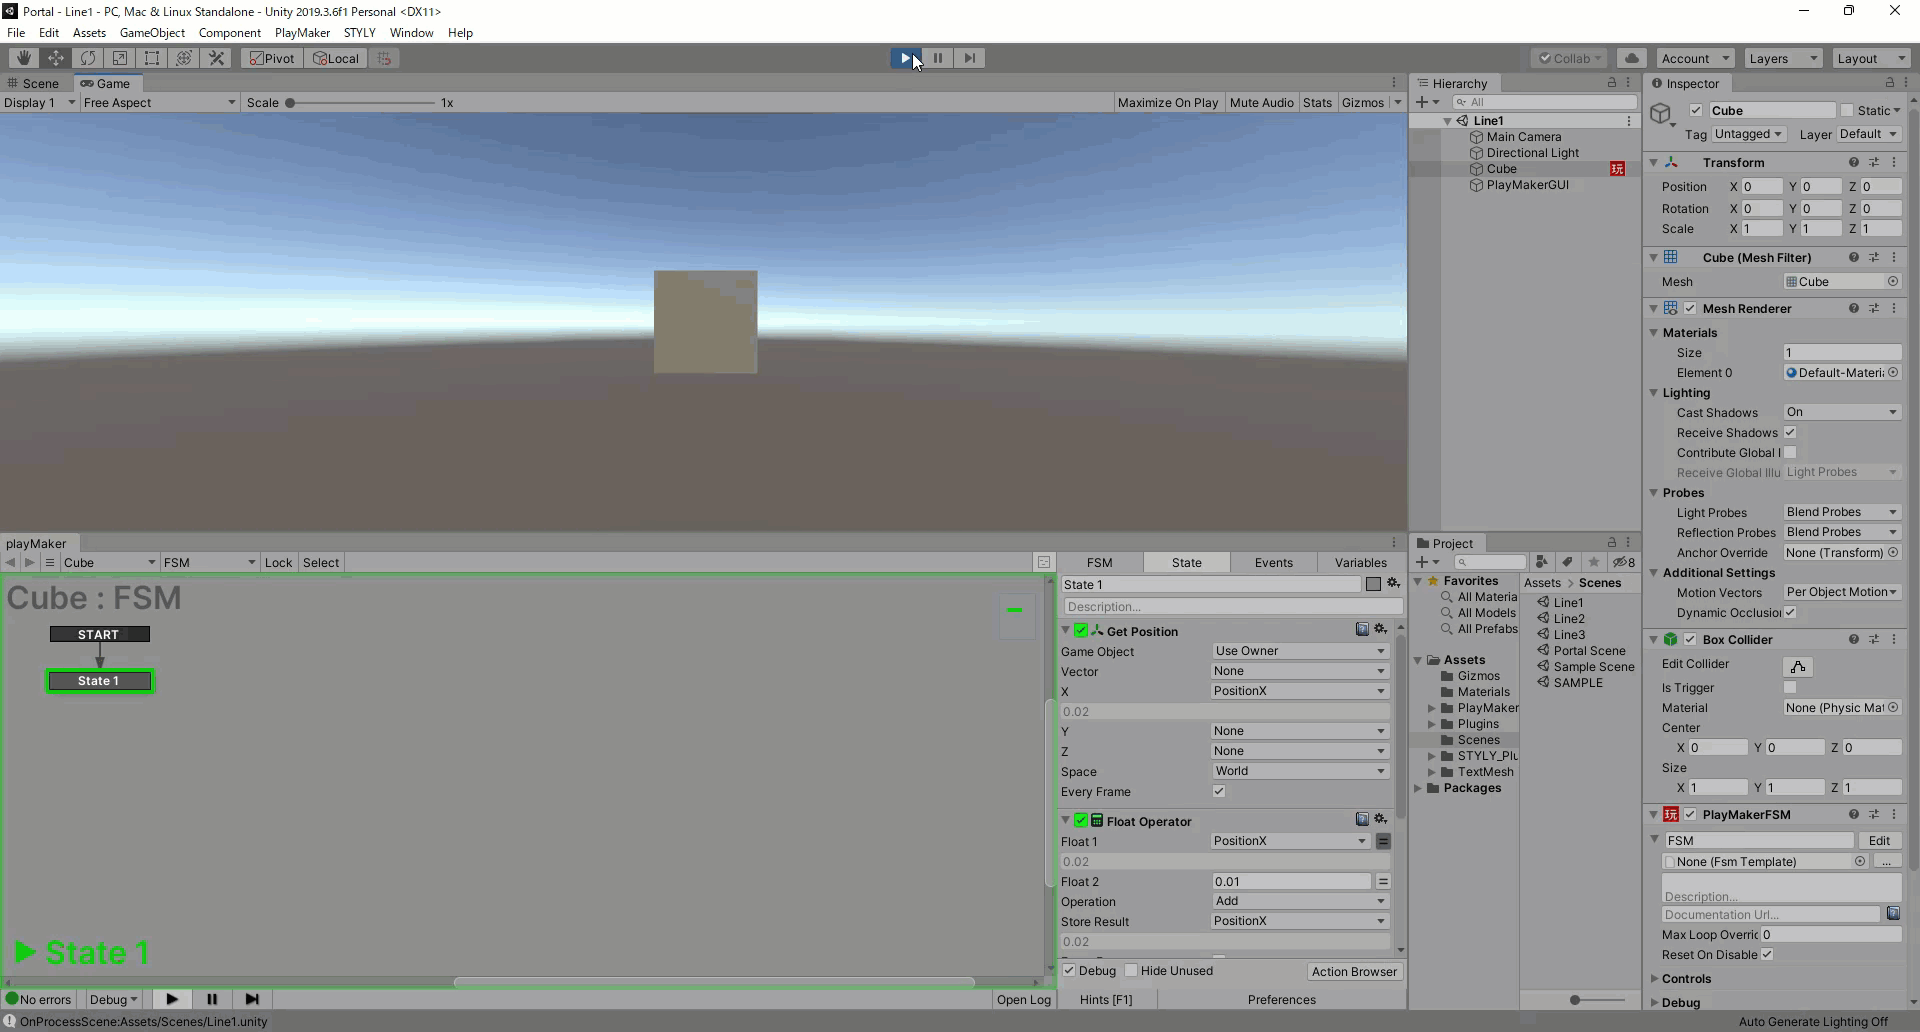
First, add PlayMakerFSM to the object you want to move.
Open the Action Browser and add “Get Position”, “Float Operator” and “Set Position” to State1.
*Actions are executed from the top, so the order is Get Position, Float Operator, and Set Position from the top.
Select a new variable “PositionX” for X in Get Position.
Check the Every Frame box for Get Position.
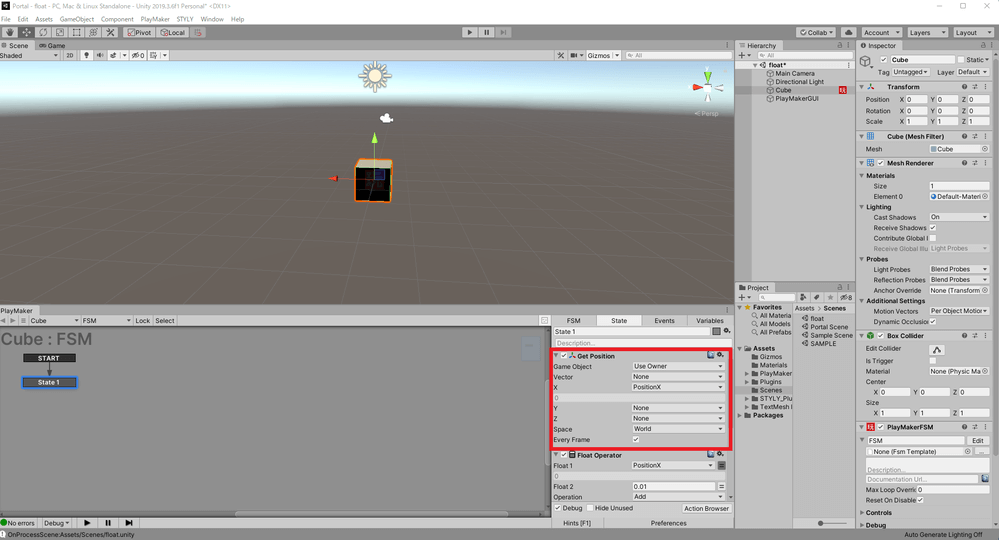
Setting up Get Position
Select the variable PositionX for Float 1 of the Float Operator and enter 0.01 for Float 2.
Select variable PositionX for Store Result in Float Operator.
Check Every Frame in Float Operator.

Set up the Float Operator.
Select variable PositionX for X in Set Position.
Check the Every Frame box for Set Position.
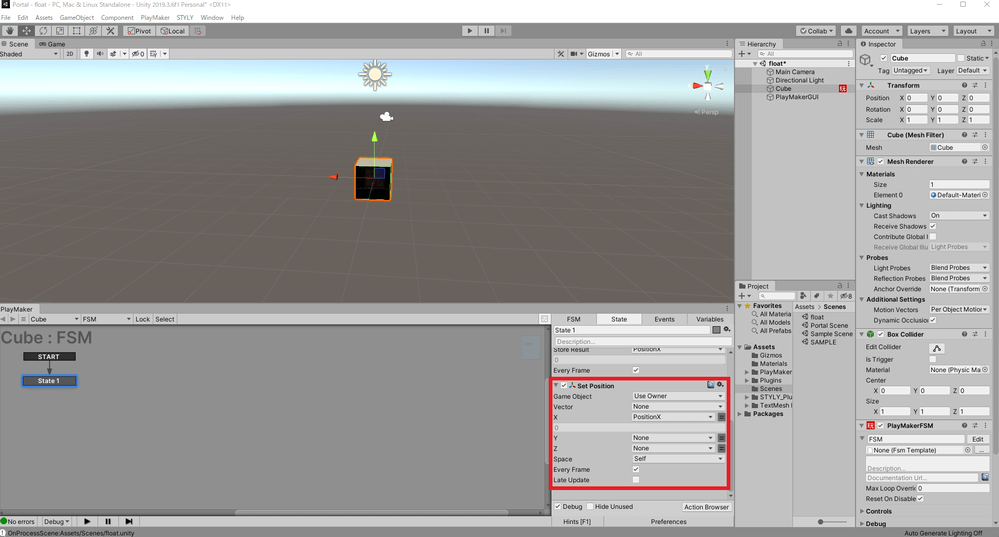
Set the Set Position setting.
The object now moves in a linear motion.
Actual Motion
Object Rotation
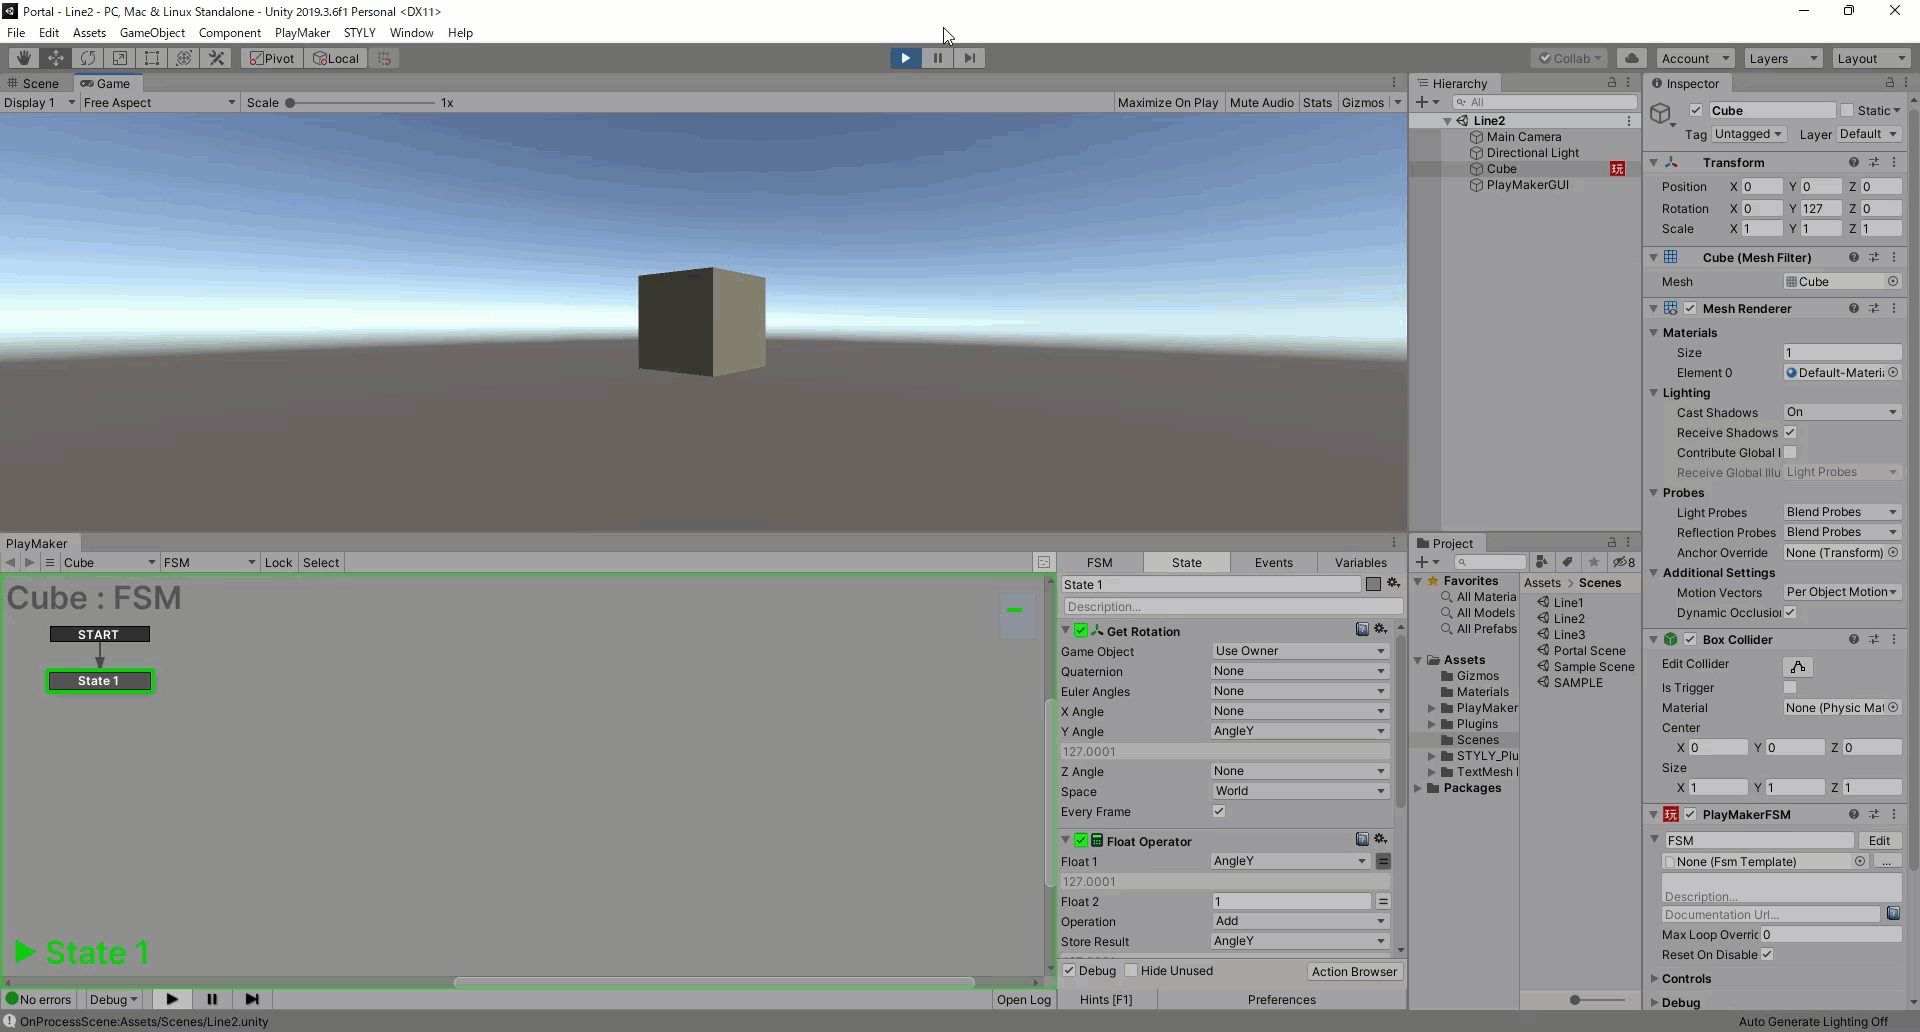
First, add PlayMakerFSM to the object you want to rotate.
Open the Action Browser and add “Get Rotation”, “Float Operator” and “Set Rotation” to State1.
*Actions are executed from the top, so the order is Get Rotation, Float Operator, and Set Rotation from the top.
Select a new variable “AngleY” for Y in Get Rotation.
Check Every Frame in Get Rotation.
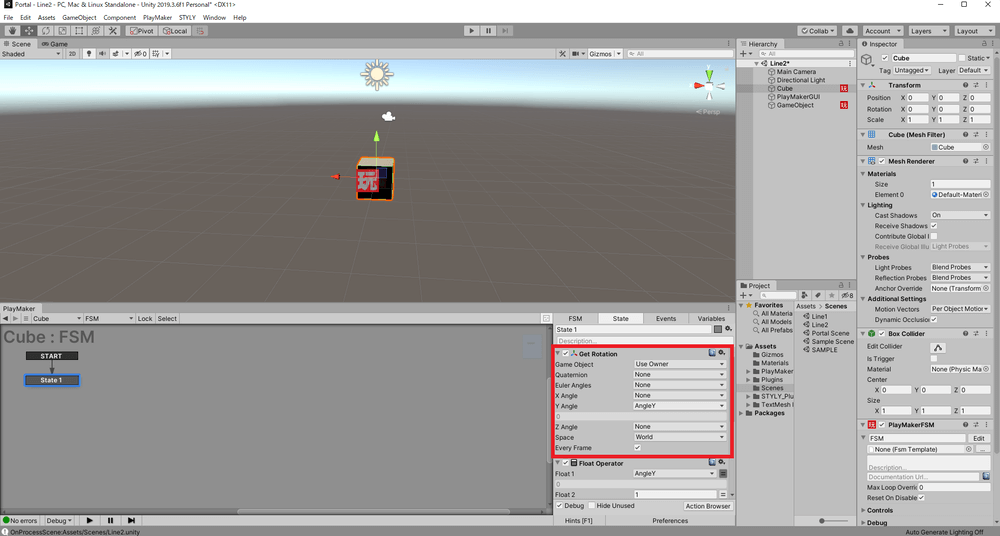
Set Rotation in Get Rotation.
Select the variable AngleY for Float 1 of the Float Operator and enter 1 for Float 2.
Select variable AngleY for Store Result in Float Operator.
Check Every Frame in Float Operator.
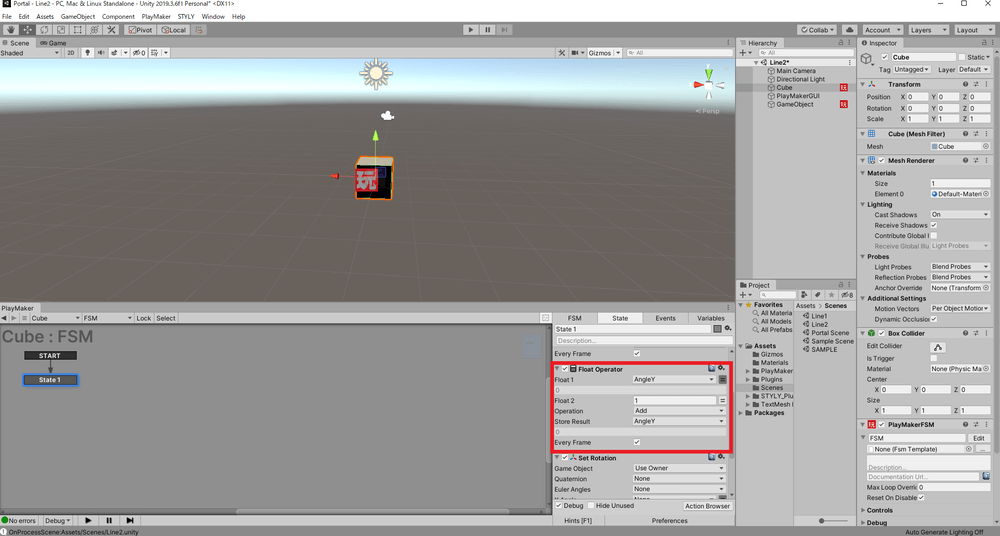
Set up the Float Operator.
Select variable AngleY for Y in Set Rotation.
Check the variable Every Frame in Set Rotation.
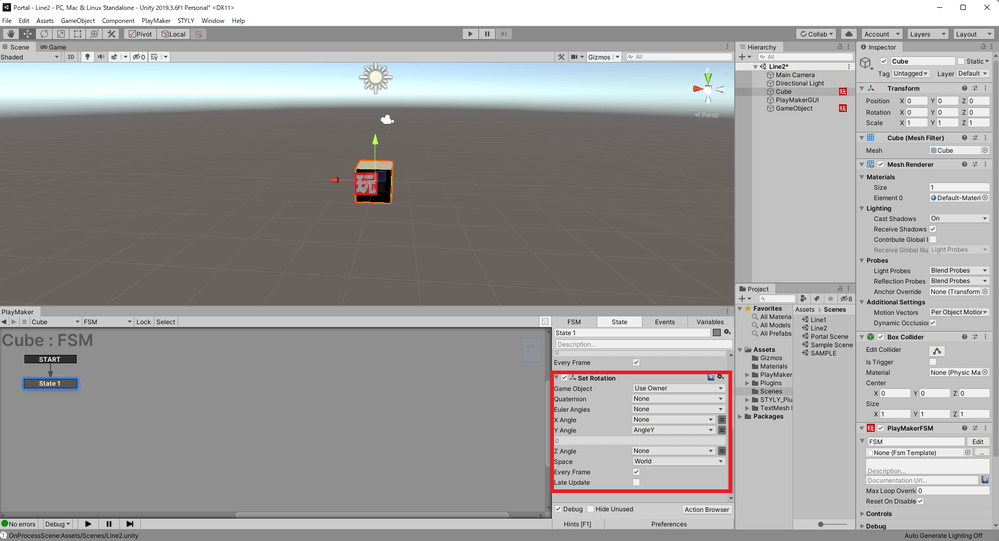
Set Rotation
The object now rotates.
Actual Motion
Circular motion of an object
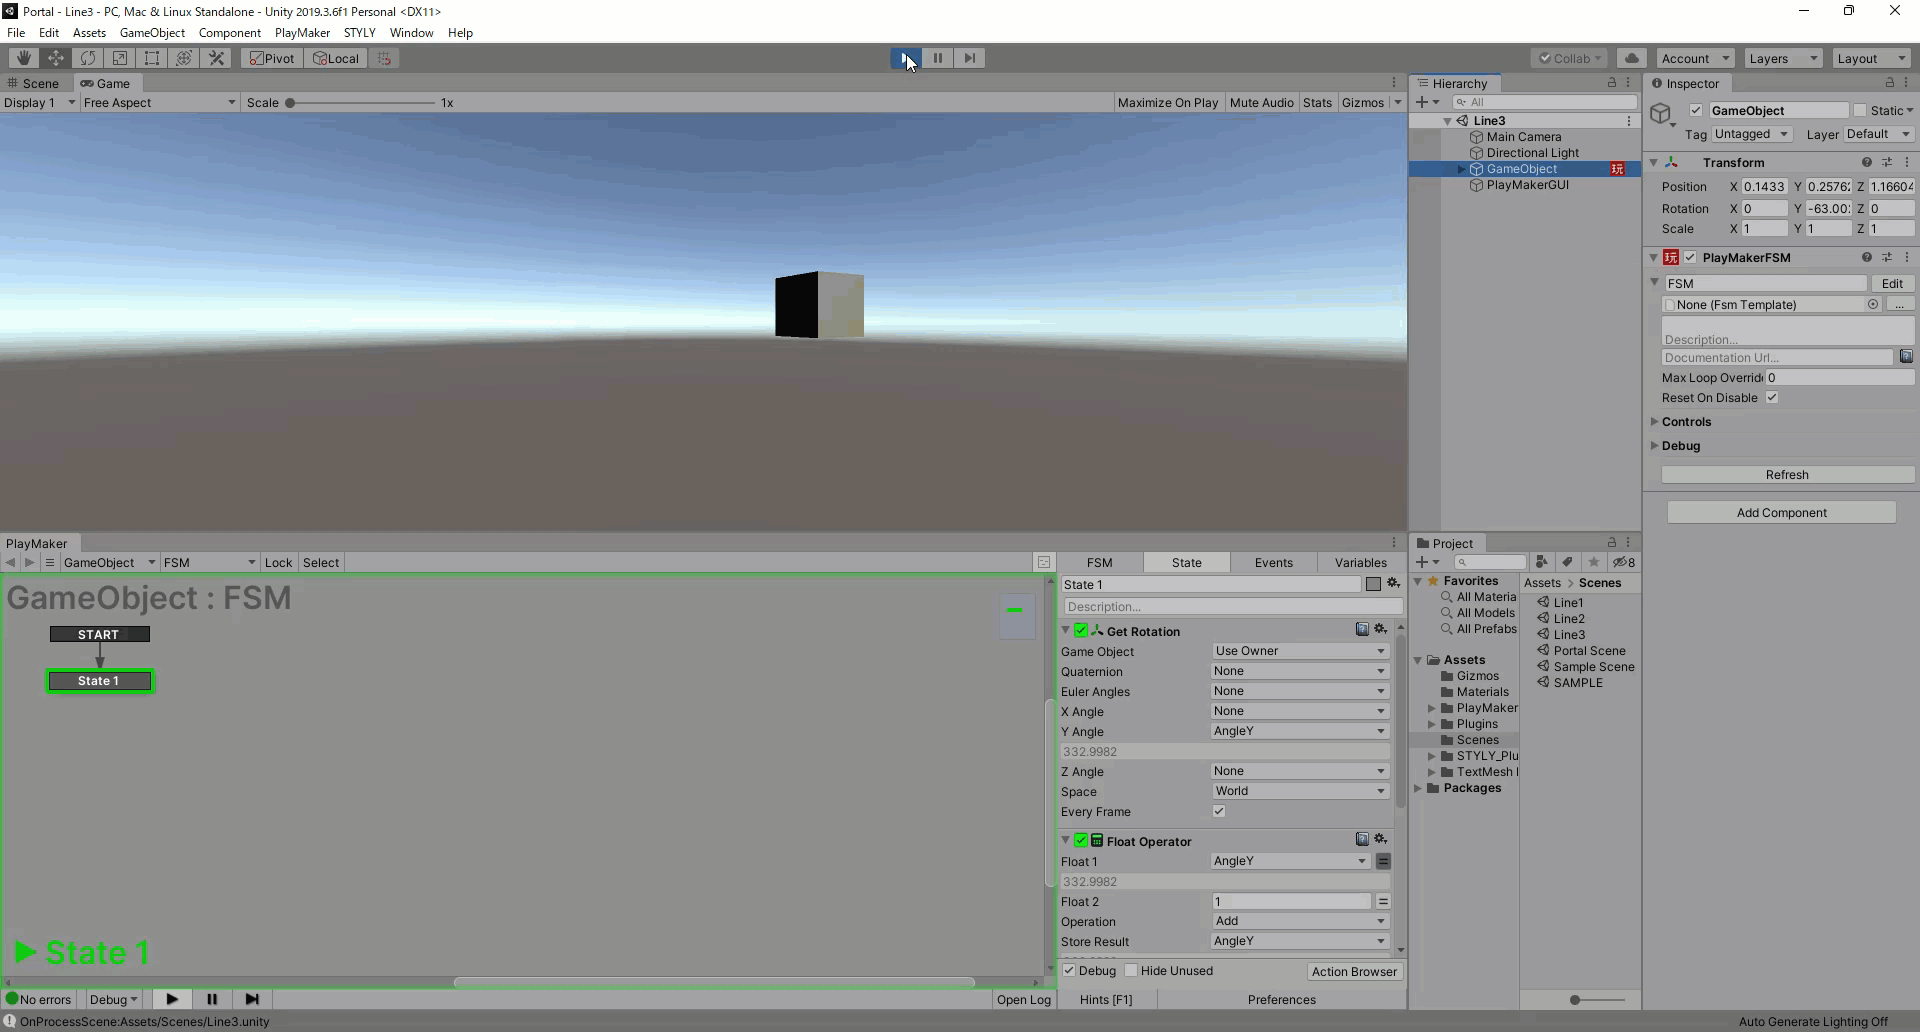
Create an empty object.
Make the object you want to move a child object of the empty object.
Enter 2 in the X of the Position of the object you want to move.
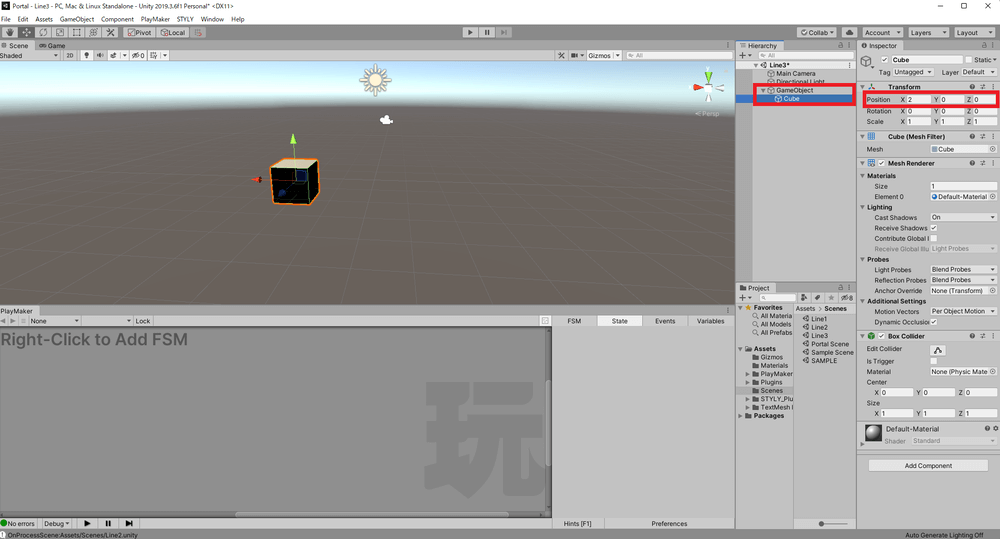
Enter 2 for the X of the Position of the object you want to move.
Apply the previous section, “Object Rotation,” to the empty object.
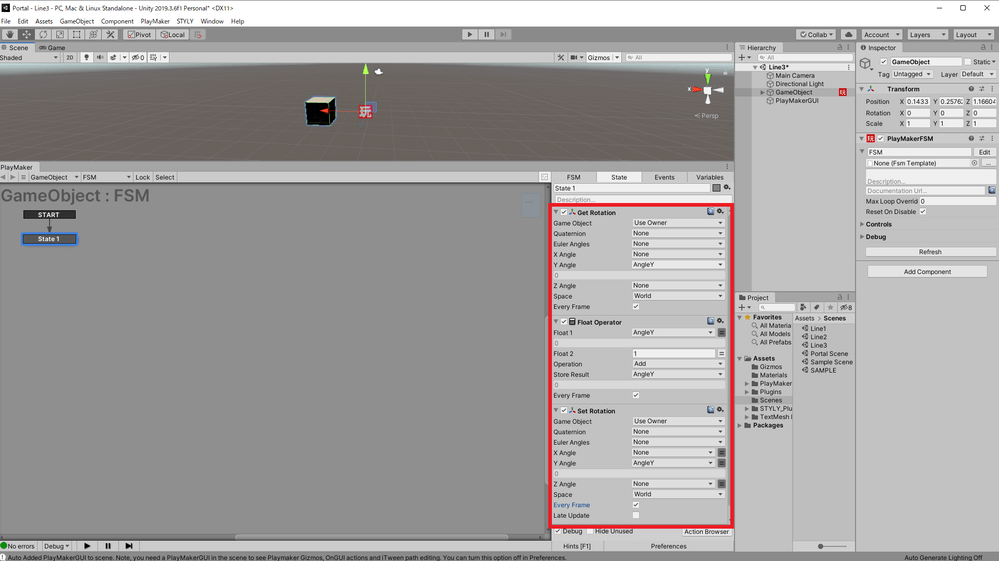
Rotate an empty object
The object now moves in a circular motion.
Actual Motion
These movements are often used in scene creation, so we encourage you to give them a try.
Conclusion
This article explained the basics and applications of variables of type int and float.
As we have shown, PlayMaker makes it easy to create Unity content without having to learn the programming language (C#) used in Unity.
In addition to the applications introduced in this article, you can express various things by using variables in PlayMaker, so we encourage you to try your hand at creating scenes using PlayMaker.
How to upload to STYLY
Upload your 3D model to STYLY.
How to create a STYLY account

How to upload 3D models to STYLY

How to upload from Unity to STYLY

You can use STYLY FORUM to solve the problem. STYLY FORUM is a place where people can discuss a service or technical issue on STYLY, or provide bug reports on STYLY.
https://en.forum.styly.cc/support/discussions